


How to Create and Link Dependencies Between Tasks
Introduction
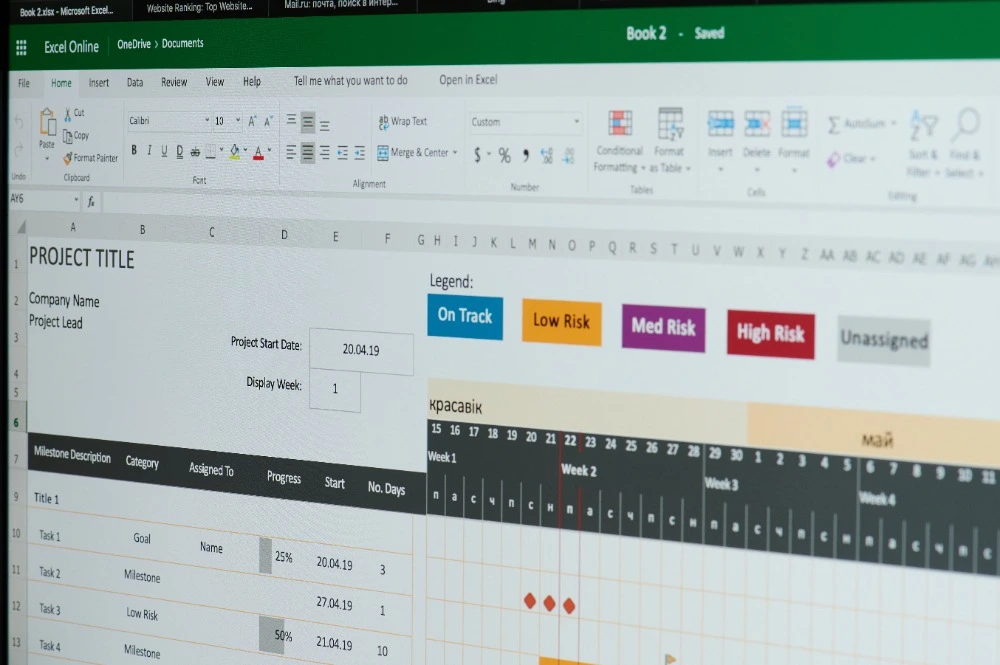
When you’re managing a project, it’s not enough to list all the tasks you need to complete — you also need to know how they relate to each other. Some tasks can happen at the same time, while others must be finished before the next one can start.
This relationship between tasks is called a dependency. Setting up dependencies in Microsoft Project helps you build an accurate schedule, identify potential bottlenecks, and keep your project on track.
In this guide, you’ll learn what task dependencies are, how to create and link them in Microsoft Project, and how to adjust them for real-world conditions. By the end, you’ll be able to manage your project timeline more confidently and effectively.
What Are Task Dependencies?
A task dependency shows how one task relies on another. In project scheduling, dependencies define the order of work — what must happen first, what can run in parallel, and what comes next.
For example:
- You can’t start painting until plastering is complete.
- Testing can’t begin until development finishes.
- Design and content writing might happen at the same time.
Microsoft Project uses dependencies to automatically calculate your critical path — the sequence of tasks that determines your project’s total duration.
The Four Types of Dependencies
When linking tasks, you can choose from four relationship types.
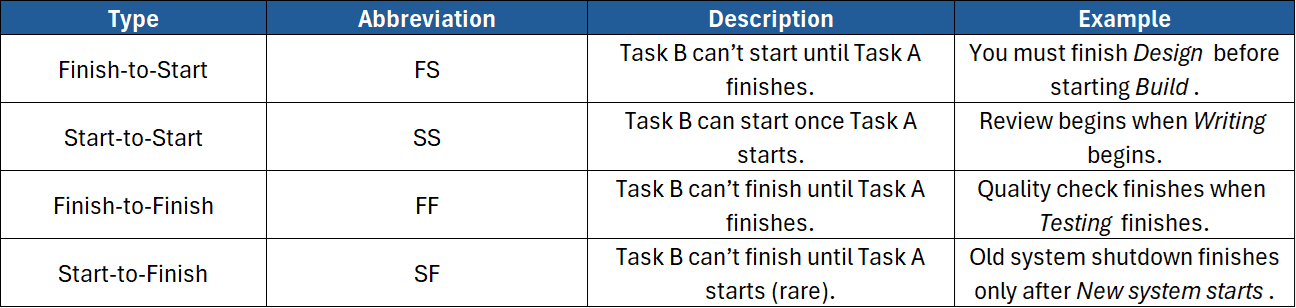
The Finish-to-Start relationship is the most common in most schedules.
Step 1: Enter Tasks into Microsoft Project
Before creating dependencies, you need to have all your project tasks listed.
- Open Microsoft Project.
- In Gantt Chart view, enter each task name in the Task Name column.
- Add durations (e.g. 3 days, 1 week).
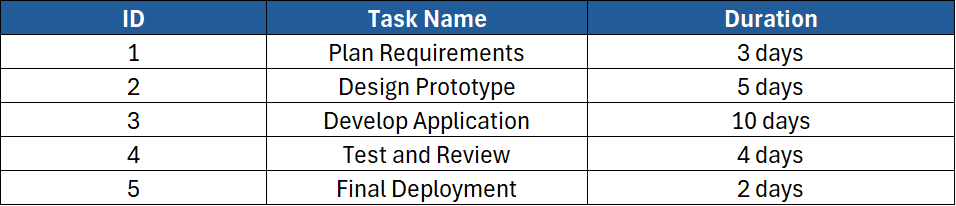
- Leave start and finish dates empty for now — Project will calculate them automatically once you add links.
Example:
Step 2: Link Tasks Using the Ribbon
To link tasks quickly:
- Select the two tasks you want to connect (click and drag, or hold Ctrl).
- Go to the Task tab on the ribbon.
- Click Link the Selected Tasks (chain-link icon).
Project creates a Finish-to-Start (FS) link by default — meaning Task 2 starts when Task 1 finishes.
You’ll see arrows appear between the tasks in the Gantt Chart.
Step 3: Link Tasks Using the Predecessors Column
Another way to link tasks is through the Predecessors column.
- In the Gantt Chart table, right-click a column heading → Insert Column → choose Predecessors.
- In the Predecessors cell for each task, type the ID number of the task it depends on.
Example:
- Task 2 has predecessor 1 → linked FS to Task 1.
- Task 3 has predecessor 2 → linked FS to Task 2.
You can link multiple predecessors by separating them with commas (e.g. 1, 2).
Step 4: Specify the Link Type
By default, every link is Finish-to-Start, but you can change it:
- Double-click the successor task (the one that depends on another).
- In the Task Information dialog, go to the Predecessors tab.
- Under Type, choose:
- Finish-to-Start (FS)
- Start-to-Start (SS)
- Finish-to-Finish (FF)
- Start-to-Finish (SF)
This flexibility lets you model overlapping or concurrent work more accurately.
Step 5: Add Lag or Lead Time
Sometimes, tasks need a gap or overlap between them.
- Lag time = a delay between tasks.
- Lead time = an overlap where the next task starts early.
You can add these directly in the Predecessors column or dialog box.
Examples:
1FS+2d→ Task 2 starts 2 days after Task 1 finishes (lag).1FS-1d→ Task 2 starts 1 day before Task 1 finishes (lead).
Lag and lead times fine-tune your schedule to reflect reality.
Step 6: Check Task Relationships in the Gantt Chart
After linking tasks, review the Gantt Chart to confirm that arrows and dates make sense.
- Hover over arrows to see which tasks are connected.
- Adjust links if you notice impossible overlaps or missing gaps.
- Drag arrows manually between bars to create or edit links visually.
The chart provides a clear visual representation of dependencies.
Step 7: Viewing the Network Diagram
To see how tasks connect at a glance, switch to the Network Diagram view.
- Go to View → Network Diagram.
- Boxes represent tasks, and arrows show relationships.
This “flow-chart” view is especially useful for identifying critical paths and potential schedule conflicts.
Step 8: Breaking Task Links
If you’ve made a mistake or need to remove a dependency:
- Select the tasks you want to unlink.
- On the Task tab, click Unlink Tasks (broken chain icon).
You can also delete a specific predecessor directly from the Predecessors column.
Step 9: Working with Summary Tasks
Be careful when linking summary tasks (those that group subtasks).
- Linking summary tasks can create circular logic or unwanted constraints.
- It’s generally better to link individual subtasks instead.
Only use summary-level dependencies when you truly want the entire phase to depend on another.
Step 10: Creating Cross-Project Dependencies
In larger organisations, one project often depends on another.
To link tasks between separate project files:
- Open both project files in Microsoft Project.
- In one project, select the dependent task.
- In the Predecessors cell, type:
[ProjectName]\TaskID
- Example:
Design_Project.mpp\15
Project creates an external link (called a cross-project dependency).
A small link icon appears beside the task name to indicate the connection.
Step 11: Viewing and Managing Dependencies
To review all relationships:
- Go to Task → Information → Predecessors or Successors tabs.
- Or switch to Task Usage or Detail Gantt view for a complete breakdown.
You can also enable the Task Inspector (under the Task tab) to check scheduling issues and see how dependencies influence dates.
Step 12: Adjusting Dependencies When Plans Change
Real projects rarely run perfectly. If one task slips, dependencies help you see exactly what’s affected.
- When a task’s duration changes, all linked successor tasks automatically reschedule.
- To adjust without breaking logic, change lags or constraints instead of unlinking tasks.
Microsoft Project recalculates timelines instantly — saving you hours of manual work.
Step 13: Highlighting the Critical Path
Your critical path is the sequence of tasks that directly affects your project’s completion date.
To view it:
- Go to Format → Critical Tasks.
- Red bars in the Gantt Chart show tasks with no slack (float).
Because dependencies drive the critical path, reviewing these links helps you identify where delays matter most.
Step 14: Avoiding Common Dependency Mistakes
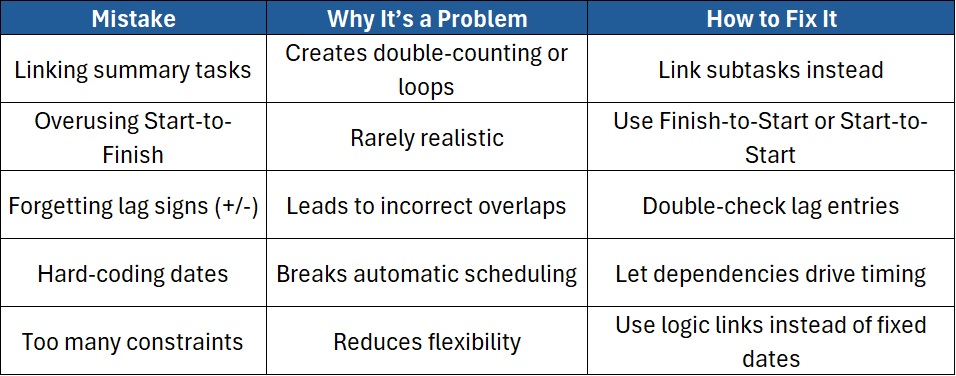
Clean dependency structures keep your plan dynamic and adaptable.
Step 15: Using Dependencies with Milestones
Milestones (tasks with zero duration) mark key events or checkpoints.
Linking tasks to milestones helps track project progress.
Example:
- Task “Testing Complete” → milestone “Client Sign-off”.
- Once “Testing Complete” finishes, the milestone date automatically updates.
This keeps stakeholders informed of critical deliverables.
Step 16: Fine-Tuning with Advanced Features
Experienced Project users can further refine dependencies using:
- Task Inspector – to diagnose scheduling conflicts.
- Change Highlighting – to see which tasks move when a dependency changes.
- Task Drivers Pane – to trace exactly why a task starts on a certain date.
- Baseline Comparison – to measure schedule variance once dependencies are set.
These tools appear in the Task and View tabs.
Step 17: Printing and Sharing Dependency Views
When presenting schedules:
- Use the Network Diagram or Tracking Gantt for clear visuals.
- Export to PDF or Visio to share with non-Project users.
- Always label key dependency lines, especially those on the critical path.
Good visual communication helps teams understand relationships instantly.
Step 18: Why Dependencies Matter
Dependencies aren’t just arrows on a chart — they’re the logic behind your entire schedule.
They:
- Help predict completion dates accurately
- Identify tasks that can run in parallel
- Reveal where delays will cause knock-on effects
- Simplify resource management and risk planning
Understanding dependencies is one of the most valuable skills in project management.
Conclusion
Creating and linking dependencies between tasks is the foundation of effective scheduling in Microsoft Project. By building logical relationships, you ensure your plan reflects the real order of work and adjusts automatically when things change.
In this guide, you’ve learned how to:
- Link tasks using the Ribbon and Predecessors column
- Choose the right dependency type
- Apply lead and lag times
- Manage and troubleshoot links
- View dependencies in Gantt and Network diagrams
If you’d like to develop your Microsoft Project skills further, ExperTrain offers hands-on training suitable for every level:
- Microsoft Project Introduction – Learn the basics of creating projects, entering tasks, and using Gantt Charts.
- Microsoft Project Intermediate – Master dependencies, constraints, resources, and schedule optimisation.
- Microsoft Project Advanced – Explore advanced scheduling, critical-path analysis, and project baselining.
With expert instruction, you’ll be able to build dynamic schedules that respond intelligently to real-world changes.

