


How to Create and Join a Team in Microsoft Teams

Introduction
Microsoft Teams is where your people, conversations, files, and meetings come together. But before you can work together, you need a team — a shared space that holds your channels, posts, files, apps, and permissions. In this guide, you’ll learn how to create a new team, how to join an existing one, and how to set things up so your workspace stays tidy, secure, and easy to use.
We’ll cover the basics (creating, joining, inviting members) and the smart stuff (private vs shared channels, naming, guest access, file storage, notifications, and governance). Everything is written in simple 8th-grade English with practical steps you can follow straight away.
What is a “team” in Microsoft Teams?
A team is a workspace for a group of people who are working together. Inside each team you’ll find:
- Channels – topic-based spaces like “General”, “Planning”, or “Client-A”.
- Posts – conversations that stay in context.
- Files – stored in SharePoint, organised by channel.
- Tabs & Apps – Planner (Tasks), OneNote, Power BI, and more.
- Permissions – who can see what, and who can post or create channels.
Think of a team as a house, and channels as the rooms. You can add rooms for each topic so conversations and files don’t get mixed up.
Before you create a new team (quick checklist)
Before you click “Create”, ask yourself:
- Does a team already exist for this group or project?
Duplicate teams split discussions and files. Search first. - What’s the purpose and audience?
Department, project, community, or cross-functional working group? - Who needs access?
Internal members only? Any guests (external partners/clients)? - How long will it live?
Short project or ongoing? Plan naming and archiving accordingly. - Are there policies to follow?
Your organisation may control who can create teams, invite guests, or use certain apps.
If you’re unsure, check with IT or your manager. Creating fewer, well-named teams keeps everyone productive.
Part 1 — How to create a team
You’ll need permission to create teams. If the button is missing, your organisation may restrict it. In that case, request a team from IT.
A) Create a team from scratch
- Open Microsoft Teams (desktop, web, or new Teams).
- Go to Teams in the left sidebar.
- Click Join or create a team (bottom of the teams list).
- Select Create team.
- Choose From scratch.
- Pick a privacy level:
- Private – owners invite specific people (best for most teams).
- Public – anyone in your organisation can join.
- Org-wide – everyone is automatically added (rare; admin-only).
- Enter a Team name and Description.
- Click Create.
- Add members now or Skip and add them later.
Tips for naming
- Project teams:
Project – Phoenix - Departments:
Finance – Month End - Clients:
Client – Contoso - Communities:
Community – Power BI User Group
Keep names short and searchable. Avoid using the same word in multiple teams.
B) Create a team from an existing Microsoft 365 Group or Team
If your group already has a Microsoft 365 Group (e.g., from Outlook, SharePoint, Planner), you can turn it into a team:
- Create team > From a group or team.
- Choose the existing group.
- Teams sets up channels and permissions using the group’s membership.
Why do this? It keeps your group’s members, calendar, and SharePoint already aligned.
C) Team privacy and when to use each type

Most teams should be Private. It keeps focus and reduces noise.
Part 2 — Set up channels (your “rooms”)
Each new team starts with a General channel. Add more channels to keep topics clean.
Channel types
- Standard – visible to all team members (most common).
- Private – visible only to selected members of the team (e.g., leadership or sensitive finance tasks).
- Shared – can include people outside the team or even outside your organisation (if enabled). Useful when two groups need to work together without switching tenants.
Create a channel
- Next to your team name, click More options (⋯) > Add channel.
- Enter Channel name and Description.
- Choose Privacy (Standard/Private/Shared).
- Tick Automatically show this channel for everyone if it’s important.
- Click Add.
Naming ideas: General, Planning, Design, Testing, Announcements, Client-A, Supplier-X.
Aim for 5–8 core channels. Add more later only if you need them.
Part 3 — Add members and set roles
Add members
- Next to the team name, click More options (⋯) > Manage team > Members.
- Click Add member.
- Type names or email addresses.
- Choose Member (default) or Owner.
Roles
- Owner – manages settings, membership, and channels.
- Member – participates in channels, posts, and files.
- Guest – external user with limited rights (if enabled by your org).
Good practice: Have at least two owners for continuity.
Part 4 — Join an existing team
There are a few ways to join:
A) Join from the Teams gallery
- Go to Teams > Join or create a team.
- If your org allows, you’ll see Public or discoverable teams.
- Click a team and choose Join team or Request to join (owner must approve).
B) Join by code
- Ask the team owner for the Team code.
- Go to Teams > Join or create a team > Join a team with a code.
- Enter the code and click Join.
C) Join from a link or email
- Owners can share a join link. Click it and confirm in Teams.
- If you’re invited, accept the email invitation.
If you can’t find a team you need: Ask the likely owner or your IT support. It may be Private or hidden from search.
Part 5 — Post, share files, and add apps (day-one setup)
Start the first post in General
- Go to Teams > [Team] > General > Posts.
- Click New conversation.
- Use the Format (A) button to add a heading and clear context.
- @mention the team to notify everyone (use sparingly).
Add files
- In any channel, open Files.
- Upload documents or drag-and-drop.
- Open in Teams, desktop app, or browser. Co-author in real time.
Behind the scenes: Channel files live in a SharePoint library. Each standard channel gets a matching folder. Private/shared channels create separate, secured sites.
Pin tabs (apps)
- In a channel, click + to add tabs like Tasks by Planner, OneNote, SharePoint page, Forms, or Power BI.
- Name tabs clearly:
Project Plan,Design Notes,Sprint Board.
Part 6 — Guest access and shared channels (working with people outside)
If you collaborate with clients or partners, you have two main options (depending on your policies):
- Guest access – Add external users as guests to your team. They switch into your tenant to participate.
- Good for ongoing projects with tight security.
- Guests see only what you share in that team/channel.
- Shared channels – Share a single channel with people outside your team (and sometimes outside your org) without switching tenants.
- Good for a specific workstream.
- Keeps external chat/files in one place.
Check with IT which option is approved. Always share only what’s needed.
Part 7 — Keep noise under control (notifications and mentions)
Tune your notifications
- Channel level: Channel > ⋯ > Channel notifications → choose All activity, Mentions, or Custom.
- Personal level: Settings > Notifications to control pop-ups, sounds, missed call alerts, and more.
Mention wisely
- Use
@Teamor@Channelfor broad updates. - Use
@Namefor a person responsible. - Don’t overuse all-team mentions — people will mute the channel.
Part 8 — Good housekeeping (naming, files, and lifecycle)
Naming rules to keep things searchable
- Use a prefix and clear topic:
Project – Phoenix,Client – Contoso. - Avoid special characters and long names.
- Don’t duplicate existing names.
File discipline
- Keep files in the channel’s Files tab, not in private chats.
- Use folders sparingly; rely on channel structure and file names.
- Use Version history (right-click file) to roll back mistakes.
Lifecycle
- When the project ends, archive the team (Owners: Manage team > Settings > Archive team).
This locks posts and files read-only but keeps them searchable. - Consider a short hand-over note pinned in General (what was delivered, where to find final documents).
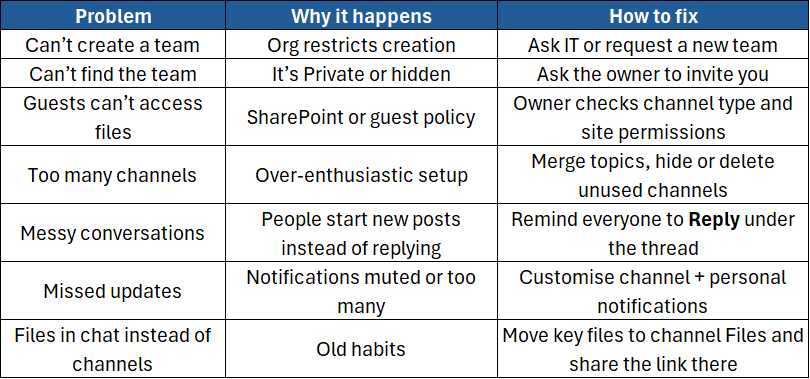
Part 9 — Common problems and quick fixes
Part 10 — Best-practice checklist (copy/paste to your team’s Welcome post)
- ✅ Keep conversations in the right channel.
- ✅ Use Reply to keep threads tidy.
- ✅ Store working documents in channel Files (not chat).
- ✅ Use @mentions only when needed.
- ✅ Add tabs for Planner (Tasks), OneNote, or key pages.
- ✅ Set Channel notifications (All / Mentions / Custom) to match your role.
- ✅ Review channels quarterly; archive or tidy as needed.
- ✅ If external people are involved, agree whether to use Guests or a Shared channel.
Conclusion
Creating or joining a team in Microsoft Teams is simple — but doing it well makes a big difference. Start with a clear purpose, set sensible privacy, create a few focused channels, and keep files and conversations in the right place. Tune notifications so you see what matters, and use tabs for the tools your team needs daily.
If you’d like hands-on practice, templates, and time-saving tips from expert trainers, join our course:
- Microsoft Teams (Instructor-Led) – Practical training on teams, channels, meetings, governance, notifications, and best-practice collaboration.

