


How to Set Page Margins and Orientation in Word

Introduction
Before you start writing a report, proposal, brochure, or assignment, it helps to set up the page correctly. Two of the most important layout settings in Microsoft Word are page margins and page orientation. Getting these right makes your document look neat, professional, and easy to print.
In this guide, you’ll learn how to:
- Choose and customise page margins
- Switch between Portrait and Landscape orientation
- Use different margins for different sections
- Add gutter margins for printing and binding
- Mirror margins for books or double-sided printing
- Fix common margin/orientation problems
- Use best practices for a clean, consistent layout
No jargon, just simple steps you can follow today.
What Are Page Margins?
Margins are the blank spaces around the edges of your page — at the top, bottom, left, and right. Margins keep text away from the edge so nothing gets cut off when printing. They also make your document easier to read.
Common margin sizes you’ll see:
- Normal (default): 2.54 cm (1 inch) on all sides
- Narrow: 1.27 cm (0.5 inch)
- Moderate: slightly wider left/right, smaller top/bottom
- Wide: larger margins—for essays and formal reports
- Mirrored: left and right margins swap on odd/even pages for double-sided printing
You can use a preset, or set a custom size.
What Is Page Orientation?
Orientation controls the direction of your page:
- Portrait: Taller than it is wide (good for most documents).
- Landscape: Wider than it is tall (great for wide tables, charts, or images).
You can use different orientations in the same document by applying section breaks (explained later).
Step 1: Set Standard Margins (Fastest Way)
- Open your document in Word.
- Go to the Layout tab (sometimes called Page Layout).
- Click Margins.
- Choose a preset: Normal, Narrow, Moderate, Wide, Mirrored.
That’s it. Your margins update immediately.
Tip: If you already have text, the content reflows — you don’t need to re-type anything.
Step 2: Create Custom Margins
Need exact measurements? Use Custom Margins.
- Layout > Margins > Custom Margins…
- In the Page Setup dialog (Margins tab), set Top, Bottom, Left, Right.
- Click Set As Default if you want to use these margins for new documents.
- Click OK.
When to use this: company brand guidelines, university rules, or when printing needs precise spacing.
Step 3: Switch Orientation (Portrait or Landscape)
- Go to Layout > Orientation.
- Choose Portrait or Landscape.
This changes the orientation for the entire document.
Need only one page in Landscape? See “Step 6: Different Margins or Orientation for Certain Pages.”
Step 4: Choose Paper Size (A4, Letter, etc.)
Margins and orientation depend on your paper size. Set that first:
- Layout > Size.
- Choose A4 (21 x 29.7 cm), Letter (8.5" x 11"), or another size.
- For custom sizes, select More Paper Sizes… and enter exact values.
Tip (UK users): A4 is the standard for most printers.
Step 5: Use Mirrored and Gutter Margins for Printing/Binding
Mirrored Margins (for two-sided printing)
If your document will be printed on both sides (like a booklet):
- Layout > Margins > Mirrored.
- Word sets Inside and Outside margins instead of Left and Right.
- The inside margin is larger to allow for binding; outside margin is smaller.
Gutter Margins (extra space for binding)
If you’re ring-binding or perfect-binding:
- Layout > Margins > Custom Margins…
- In Gutter, add extra space (e.g., 0.5–1.0 cm) on the binding side.
- Set Gutter position (Left or Top) depending on portrait/landscape and binding.
Rule of thumb: The thicker the document, the larger the gutter.
Step 6: Different Margins or Orientation for Certain Pages (Section Breaks)
Sometimes you need one wide page for a large table, or narrow margins for a cover page. Use section breaks to apply layout changes to part of a document.
Example: Make a single page Landscape
- Click at the end of the page before the one you want to rotate.
- Layout > Breaks > Next Page (creates a new section).
- Click on the new page.
- Layout > Orientation > Landscape.
- If the following pages shouldn’t be landscape, place your cursor after the landscape content, insert another Next Page section break, and switch back to Portrait.
Example: Custom margins for only one page
- Place your cursor on the target page.
- Layout > Margins > Custom Margins…
- At the bottom, set Apply to: This section.
- Set your margin sizes > OK.
Key tip: Section breaks are the only reliable way to have different margins/orientation within the same document.
Step 7: Check the Ruler and Indents (Don’t Confuse with Margins)
Margins set the page boundary. Indents control paragraph positioning inside those margins.
- Show the Ruler: View > Ruler.
- The left indent (little triangle) moves a paragraph inward.
- The first-line indent controls where the first line starts.
- The right indent pulls the right edge inward.
If your text looks too narrow, you might have heavy indents, not narrow margins. Reset indents with Home > Paragraph > dialog launcher > Indentation.
Step 8: Headers, Footers, and Margin Space
Headers and footers sit inside the margin area, but you can control their distance from the page edge.
- Double-click in the header or footer area.
- In Header & Footer tools, adjust Header from Top or Footer from Bottom.
- Use Different First Page for a unique cover page header/footer.
- Use Different Odd & Even Pages for book-style headers (e.g., chapter title on one side, document title on the other).
Tip: If page numbers look too close to the edge, increase Footer from Bottom.
Step 9: Columns, Tables, and Images vs. Margins
- Columns (Layout > Columns) divide text inside the margins. They don’t change the page margins themselves.
- Tables can extend past margins if you resize them manually. Keep tables within the margins to avoid printing cut-offs.
- Images can sit inside or outside the margins if set to In Front of Text or Behind Text. For professional layouts, keep important content within margin boundaries.
Step 10: Print Preview and Margins
Always check how margins and orientation will print.
- File > Print shows a live preview.
- If your printer can’t print to the edge, Word may warn: “One or more margins are set outside the printable area.”
- Fix by slightly increasing margins (e.g., add 0.2–0.4 cm) or choose a printer that supports borderless printing.
Tip: Save as PDF (File > Save As > PDF) to lock your layout before sharing.
Step 11: Typical Margin and Orientation Use Cases
- Business reports: A4, Portrait, Normal margins (2.54 cm).
- Academic essays: A4/Letter, Portrait, Wide or school-specified margins.
- Brochures/handouts: A4, Portrait or Landscape; narrow margins for compact content, but leave space for print bleed if designed in Word (or move to a DTP tool).
- Spreadsheets pasted in: Switch relevant pages to Landscape with Narrow margins for wide tables.
- Booklets: Mirrored margins with Gutter, printed double-sided.
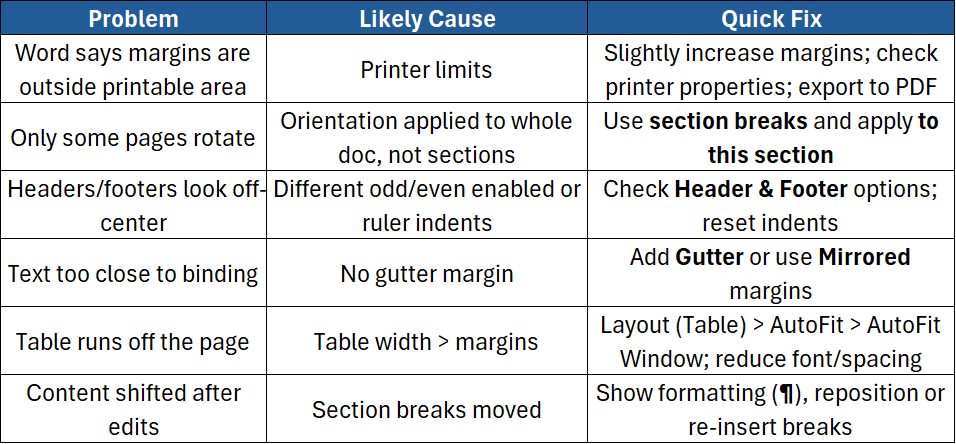
Step 12: Fixing Common Problems
Step 13: Best Practices for Clean, Consistent Documents
- Decide layout first: Set paper size, margins, and orientation before writing.
- Use presets for speed; switch to custom only when necessary.
- Keep it readable: Don’t make margins so narrow that pages feel cramped.
- Be consistent across sections; mixing too many styles looks messy.
- Use section breaks thoughtfully — label them in your notes if the document is long.
- Save a template (.dotx) with your preferred margins/orientation to start future documents quickly.
Quick Reference: Where to Click
- Margins: Layout > Margins
- Custom Margins / Gutter / Mirrored: Layout > Margins > Custom Margins…
- Orientation: Layout > Orientation
- Paper Size: Layout > Size
- Section Breaks: Layout > Breaks > Next Page
- Headers/Footers distance: Double-click header/footer > Header & Footer tab
- Print Preview: File > Print
Conclusion
Getting margins and orientation right is a small step that makes a big difference. With a few clicks, your pages will look balanced, readable, and ready to print. You now know how to:
- Apply standard or custom margins
- Switch orientation for the whole file or a single page
- Use mirrored and gutter margins for professional printing
- Control headers, footers, columns, tables, and images within the margin area
- Troubleshoot common layout issues
If you want to build your Microsoft Word skills further with hands-on practice and expert guidance, check out our instructor-led courses:
- Word Introduction – Create and format professional documents with confidence.
- Word Intermediate – Styles, sections, headers/footers, and advanced page layout.
- Word Advanced – Long documents, templates, references, and automation.

