


How to Nest Multiple IF Functions in Excel

Introduction
When working in Microsoft Excel, one of the most useful and flexible tools you’ll ever use is the IF function. It allows you to make logical comparisons — to test if something is true or false — and return different results based on the outcome.
For example, you might use an IF function to:
- Check if a student’s score is a pass or fail
- Calculate bonuses based on performance
- Apply discounts depending on purchase amounts
But what if you need to test more than one condition? That’s where nested IF functions come in.
In this guide, you’ll learn what nested IF functions are, how they work, how to build them step by step, and some better alternatives when formulas become too complex. By the end, you’ll be able to create dynamic, rule-based calculations with confidence.
What Is an IF Function?
Before we talk about nested IFs, let’s start with the basic structure of a single IF function:
=IF(logical_test, value_if_true, value_if_false)
- logical_test – The condition you want to check (e.g. A1>50).
- value_if_true – What happens if the condition is TRUE.
- value_if_false – What happens if the condition is FALSE.
Example:
=IF(A1>=50, "Pass", "Fail")
This formula checks whether the value in cell A1 is greater than or equal to 50.
- If it is, Excel returns “Pass”.
- If not, it returns “Fail”.
What Is a Nested IF Function?
A nested IF function simply means placing one IF function inside another. You “nest” multiple conditions to test several possibilities.
Example:
=IF(A1>=90, "Excellent", IF(A1>=75, "Good", IF(A1>=50, "Pass", "Fail")))
Here’s what’s happening:
- Excel checks if A1 ≥ 90 → returns “Excellent”.
- If not, it checks if A1 ≥ 75 → returns “Good”.
- If not, it checks if A1 ≥ 50 → returns “Pass”.
- If none of the conditions are true, it returns “Fail”.
Essentially, each IF statement handles a different outcome.
Step 1: Planning Your Logic
Before writing the formula, plan your conditions clearly.
For example, say you’re grading test scores:
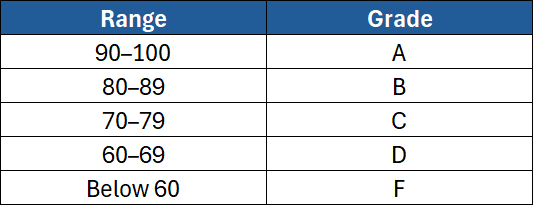
We’ll need five outcomes — so that means four nested IFs (because each condition must have a “false” alternative leading to the next check).
Step 2: Writing the First IF
Start with the top condition — the highest priority.
=IF(A2>=90, "A", ...)
If the score is 90 or above, the result will be “A”. If not, Excel will move on to the next condition.
Step 3: Adding the Second IF
Now nest another IF function inside the “false” part:
=IF(A2>=90, "A", IF(A2>=80, "B", ...))
This checks for “A” first, then “B”.
Step 4: Adding More Conditions
Keep nesting more IFs to handle all other outcomes:
=IF(A2>=90, "A",
IF(A2>=80, "B",
IF(A2>=70, "C",
IF(A2>=60, "D", "F"))))
Let’s break it down:
- If A2≥90 → “A”
- Else if A2≥80 → “B”
- Else if A2≥70 → “C”
- Else if A2≥60 → “D”
- Else → “F”
You can nest up to 64 IF functions in modern Excel versions (although more than 5–6 usually becomes confusing).
Step 5: Testing the Formula
Enter the formula in a cell and test with different numbers:
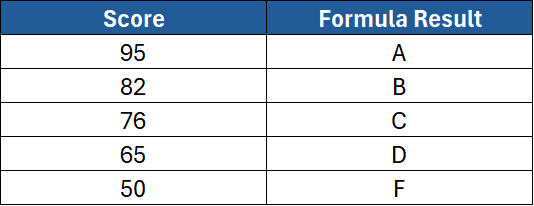
The nested IF structure works perfectly.
Step 6: Using Text and Numbers
You can use nested IFs for text-based or numeric conditions.
Example – Sales Performance Review:
=IF(B2>10000,"Excellent",
IF(B2>7000,"Good",
IF(B2>4000,"Average","Needs Improvement")))
This works just like the grading example — only this time with sales values.
Step 7: Combining IF with AND or OR
Sometimes you want to test multiple conditions at once.
Using AND
To check if two conditions are both true:
=IF(AND(A2>=50,B2>=50),"Pass","Fail")
This formula only returns “Pass” if both A2 and B2 are 50 or higher.
Using OR
To check if either condition is true:
=IF(OR(A2>=50,B2>=50),"Pass","Fail")
This returns “Pass” if one or both of the values meet the criteria.
You can nest AND/OR inside larger IF formulas too, giving you even more flexibility.
Step 8: Formatting the Output
You can return text, numbers, or even formulas as outputs.
Example – Returning Text and Numbers:
=IF(A2>1000, "High (" & A2 & ")", "Low (" & A2 & ")")
Result examples:
- If A2 = 1200 → “High (1200)”
- If A2 = 850 → “Low (850)”
This technique is often used in dashboards or reports to make results more descriptive.
Step 9: Using Nested IF with Dates
Excel treats dates as numbers, so you can compare them using IF just like other values.
Example – Checking Expiry Dates:
=IF(A2<TODAY(),"Expired",IF(A2=TODAY(),"Expires Today","Active"))
- If the date is before today → “Expired”
- If it’s today → “Expires Today”
- Otherwise → “Active”
This is especially useful for tracking deadlines, renewals, or due dates.
Step 10: Troubleshooting Nested IF Errors
When formulas get long, mistakes are easy to make. Here are some tips:
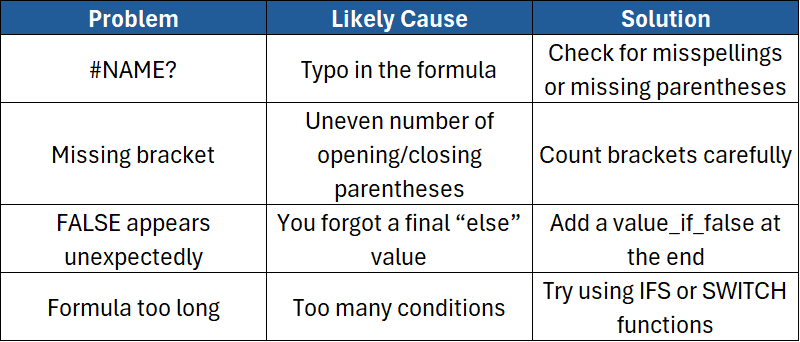
Tip: Use Alt + Enter inside the formula bar to break your nested IFs across multiple lines for readability.
Step 11: The IFS Function – A Simpler Alternative
If you’re using Excel 2016 or later, you can replace multiple nested IFs with the IFS function.
=IFS(A2>=90,"A", A2>=80,"B", A2>=70,"C", A2>=60,"D", A2<60,"F")
This formula does the same thing as our earlier example — but it’s easier to read and write.
The IFS function automatically checks conditions in order and stops at the first one that’s true.
Step 12: Combining IF with Other Functions
You can make nested IFs even more powerful by combining them with other functions:
Example 1 – IF + VLOOKUP
If your grading table is stored elsewhere, use VLOOKUP instead of multiple IFs:
=VLOOKUP(A2,$G$2:$H$6,2,TRUE)
Example 2 – IF + ISBLANK
To return a blank cell if no value is entered:
=IF(ISBLANK(A2),"",IF(A2>=50,"Pass","Fail"))
Example 3 – IF + TEXT
For formatted output:
=IF(B2>1000, "Target met (" & TEXT(B2,"£#,##0") & ")", "Below target")
Combining IF with other Excel functions adds flexibility and automation to your spreadsheets.
Step 13: Using Nested IFs for Letter Grades with “+” and “–”
You can even extend the grading system to include subgrades.
Example:
=IF(A2>=90,"A",
IF(A2>=85,"B+",
IF(A2>=80,"B",
IF(A2>=75,"C+",
IF(A2>=70,"C","F")))))
Although functional, this approach can become difficult to maintain. For more complex scenarios, a lookup table or IFS function is much easier.
Step 14: Limitations of Nested IF Functions
While nested IFs are useful, they have some drawbacks:
- Hard to read – Long formulas can be confusing to maintain.
- Error-prone – Easy to forget a bracket or comma.
- Limited scalability – Not ideal for many categories or frequent updates.
If you find yourself nesting more than five conditions, consider using IFS, VLOOKUP, SWITCH, or CHOOSE instead.
Step 15: Real-World Examples
Example 1: Employee Bonus Levels
=IF(C2>=100000,"Gold",
IF(C2>=75000,"Silver",
IF(C2>=50000,"Bronze","No Bonus")))
Use this to classify employees by sales results.
Example 2: Delivery Status
=IF(D2="Yes","Delivered",
IF(E2="Yes","In Transit","Pending"))
Example 3: Cost Category
=IF(B2<100,"Low",
IF(B2<=500,"Medium",
IF(B2<=1000,"High","Very High")))
Each example follows the same nested IF principle — simple, structured, and logical.
Step 16: Best Practices for Nested IF Functions
- Start with the most restrictive condition first.
- Indent or break the formula across lines for readability.
- Test each condition separately before combining them.
- Document your logic using comments or notes in Excel.
- Use lookup tables instead of long nested formulas when possible.
A well-organised formula not only saves time but also prevents costly errors later.
Conclusion
Nested IF functions are one of Excel’s most powerful tools for decision-making and logical testing. They allow you to handle multiple outcomes in one formula, turning your spreadsheet into an intelligent model that can respond to real-world data.
In this guide, you learned how to:
- Write single and multiple IF statements
- Nest IFs to test several conditions
- Combine IF with AND, OR, and other functions
- Simplify formulas using IFS or VLOOKUP
- Avoid common mistakes and improve readability
If you’d like to take your Excel skills to the next level, ExperTrain offers professional courses designed for every experience level:
- Excel Introduction – Learn the basics of formulas, formatting, and data entry.
- Excel Intermediate – Explore logical functions like IF, AND, and OR in depth.
- Excel Advanced – Master nested functions, lookups, and dynamic formulas.
- Excel Power User – Develop complex logic using IFS, SWITCH, and data models.
With expert-led training, you’ll learn how to create smarter, faster, and more reliable spreadsheets that impress colleagues and clients alike.

