


How to Add Shapes and Icons to a Slide
Introduction
Shapes and icons are the building blocks of modern slides. They help you explain ideas quickly, create visual flow, and keep your audience focused. With a few simple tools in Microsoft PowerPoint, you can build clean diagrams, show processes, point to key facts, and make your slides look professional without hiring a designer.
This step-by-step guide shows you how to insert shapes and icons, format them neatly, align and distribute objects, merge shapes into custom graphics, use SVGs, apply consistent styling, and animate with taste. We’ll also cover accessibility, templates (Slide Master), file size tips, and common fixes.
Everything is written in friendly, 8th-grade English, so you can follow along and start improving your slides today.
1) Where to find Shapes and Icons
Insert Shapes
- Go to Insert > Shapes.
- Pick a shape: rectangles, circles, arrows, callouts, lines, flowchart symbols, stars, etc.
- Click on the slide and drag to draw the shape.
Tip: Hold Shift while dragging to make perfect circles or squares. Hold Shift while rotating to snap to 15-degree angles.
Insert Icons (built-in library)
- Go to Insert > Icons (or Graphics in some builds).
- Search for a keyword (e.g., “email”, “cloud”, “security”).
- Choose one or more icons and select Insert.
Icons are vector graphics (usually SVG). They scale without losing quality and allow easy color changes.
2) Draw with accuracy: snapping, guides, and the grid
Clean alignment makes slides look “designed.”
- Guides & Gridlines: Go to View and tick Guides and Gridlines.
- Smart Guides: When you move an object, purple lines appear to help you align with other objects.
- Snap to Grid: In View, enable Snap objects to grid for tidy positioning.
- Nudge keys: Use arrow keys for precise movement. Press Shift + Arrow for larger steps.
3) Format shapes like a pro
When you select a shape, the Shape Format tab appears.
Fill, outline, and effects
- Shape Fill: Solid color, gradient, picture, or pattern.
- Shape Outline: Color, thickness (Weight), and Dashes.
- Shape Effects: Shadow, Glow, Soft Edges, Bevel, 3-D Rotation.
Best practice: Keep effects subtle. A thin outline and a soft shadow can add depth without distraction.
Make it on-brand
- Use your theme colors (top row of the color picker).
- Save presets: right-click the shape > Set as Default Shape to reuse the same styling for new shapes.
Use the Format Pane
Right-click a shape > Format Shape to open a pane with detailed controls for Fill, Line, Effects, and Size & Properties.
4) Build fast with the mini toolbar and Eyedropper
- Mini toolbar: When you right-click or select text, a small toolbar appears. Use it for quick color and text changes.
- Eyedropper: To match a color from an image or logo, open Shape Fill > Eyedropper, then click on the color you want to sample.
5) Duplicate, align, and distribute for neat layouts
Duplicate quickly
- Ctrl/Cmd + D duplicates an object.
- Ctrl/Cmd + Drag also duplicates while moving.
- Format Painter: Select a well-styled shape, click Home > Format Painter, then click another shape to copy its style.
Align and distribute
- Select multiple shapes (hold Shift and click each).
- Go to Shape Format > Align.
- Choose Align Left/Center/Right or Top/Middle/Bottom.
- Use Distribute Horizontally/Vertically to space objects evenly.
Tip: Align to Slide (not to Selected objects) for precise centering on the canvas.
6) Create custom graphics with Merge Shapes
Sometimes you need a shape you can’t find in the gallery. Build your own:
- Add two or more shapes and overlap them.
- Select them in order (the first one’s attributes often carry through).
- Go to Shape Format > Merge Shapes and try:
- Union – combine all shapes
- Combine – subtract overlapping areas (creates holes)
- Fragment – cut into pieces at overlaps
- Intersect – keep only the overlap
- Subtract – cut the top shape out of the bottom
Example: Draw a circle over a rectangle and Subtract to create a rounded tab or notch.
Pro tip: Convert icons to shapes (see SVG section) and then merge with them for unique pictograms.
7) Work with Icons and SVGs (scalable vectors)
Color and resize icons
- Select the icon (SVG) and use Graphics Fill and Graphics Outline to change colors.
- Drag corners to resize without losing quality.
Convert to shapes for deeper edits
- Right-click an icon > Convert to Shape (or Ungroup twice on some versions).
- Now you can edit individual parts, merge with other shapes, or delete details you don’t need.
Note: After converting, it becomes native PowerPoint shapes. Keep a copy of the original icon off-canvas if you want to revert.
8) Add text, callouts, and labels
Text inside shapes
- Click a shape and start typing.
- Set Text Box options (right-click > Format Shape > Text Options > Text Box) to control padding and vertical alignment.
Text outside shapes (labels)
- Use a Text Box for labels that sit next to shapes.
- Shift-drag to keep text boxes aligned; group with the related shape (see next section).
Callouts and pointers
- Insert > Shapes > Callouts for speech bubbles or pointers.
- Drag the yellow handle to aim the callout at the exact point of interest.
9) Group, order, and the Selection Pane
Grouping
- Select related items (shape + label) and press Ctrl/Cmd + G to Group.
- Grouped objects move and resize together.
- Ctrl/Cmd + Shift + G ungroups.
Layer order
- Right-click a shape > Bring to Front / Send to Back to control stacking.
- For complex slides, open Home > Arrange > Selection Pane.
- Rename objects (e.g., “Icon – Email”, “Badge – New”).
- Drag items up/down in the list to change order.
10) Shape masks and image frames
Want an image in a specific shape?
- Insert an image.
- Select it > Picture Format > Crop > Crop to Shape (choose a shape).
- Use Crop again to adjust the visible area.
Alternative: Draw a shape, set Shape Fill > Picture, choose an image, and adjust Transparency for a stylish overlay.
11) Build diagrams the easy way (or with SmartArt)
Manual method (more control)
- Place shapes (e.g., circles for steps), add Connector lines (Insert > Shapes > Lines > Elbow or Straight Connector).
- Connectors “snap” to shape edges and stay attached even if you move the shapes.
SmartArt (quick start)
- Insert > SmartArt, pick Process, Cycle, or Hierarchy.
- Enter your text.
- You can Convert to Shapes later for full control.
12) Consistency at scale: Slide Master and templates
If you add shapes or icons repeatedly across a deck, put them on the Slide Master:
- Go to View > Slide Master.
- Add logo, corner decorations, divider lines, or standard icon sets to Master or Layout slides.
- Exit Slide Master.
- Apply your layout to slides to keep design consistent.
This ensures alignment, sizes, and colors are the same everywhere.
13) Color systems that always look good
For a cohesive look:
- Pick one primary color (brand) and one accent (for highlights).
- Use neutral fills (light grey/white) with brand outlines to keep things clean.
- For icons, stick to single-colour or two-tone styles across the deck.
- Consider duotone: all icons in charcoal, highlights in brand accent.
14) Accessibility and clarity
Make your slides usable by everyone:
- Alt Text: Right-click graphics > View/Edit Alt Text. Briefly describe the meaning (“Envelope icon for email” or “Three arrows showing process flow”).
- Contrast: Ensure text on shapes meets contrast guidelines (dark text on light fill or the reverse).
- Size: Minimum 14–16 pt text. Icons should be large enough to read at the back of a room.
- Don’t rely on colour alone: Use labels or shapes to indicate status (not just red/green).
15) Animating shapes and icons (light and tasteful)
Animation should support your story, not steal the show.
- Use Appear or Fade for simple reveals.
- Wipe works well for building flows left-to-right.
- In Animation Pane, set Start to On Click (for pacing) or With Previous (for grouped reveals).
- Use Duration (0.3–0.5s) and limited Delay.
- The Morph transition creates smooth movement between slides for icons/objects with the same name.
Keep it consistent: Use the same animation style throughout to avoid distraction.
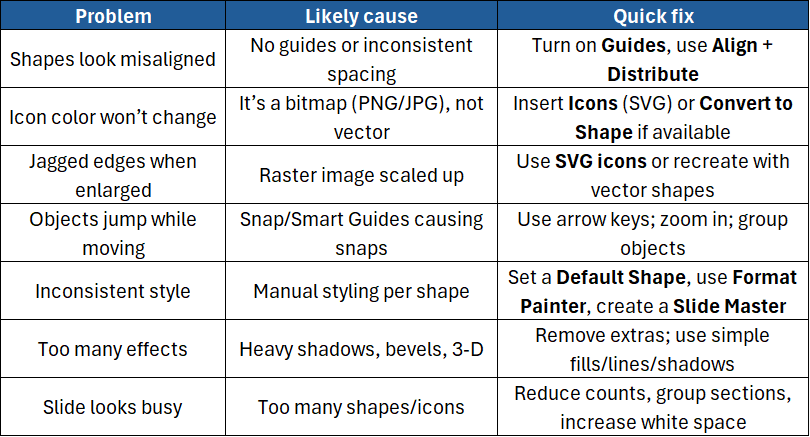
16) Common problems and quick fixes
17) Keyboard shortcuts that speed you up
- Duplicate:
Ctrl/Cmd + D - Group / Ungroup:
Ctrl/Cmd + G/Ctrl/Cmd + Shift + G - Bring to Front / Send to Back:
Ctrl/Cmd + ]/Ctrl/Cmd + [ - Nudge: Arrow keys (hold Shift for larger steps)
- Copy formatting: Format Painter (double-click to lock)
- Zoom:
Alt/Option + Scroll(or status bar slider)
18) File size and performance tips
- Prefer SVG icons and vector shapes; they’re tiny and scale cleanly.
- For photos, use Compress Pictures (Picture Format > Compress).
- Avoid pasting high-resolution screenshots at 4K if you only need them small.
- Limit animation complexity; Morph across dozens of objects can slow playback on older machines.
19) Five reliable design patterns you can reuse
- Icon + Heading + 2 lines of text
- Three columns across the slide for features/benefits.
- Process timeline
- Circles or chevrons with numbers 1–5; Wipe animation left-to-right.
- Comparison cards
- Two rectangles with icons at top; use a tick/cross set for features.
- Diagram with callouts
- Central image or circle; callouts around the edges pointing to key parts.
- Section divider
- Full-width rectangle banner with large icon and section title.
Build each once, then duplicate and change labels — fast and consistent.
Conclusion
Shapes and icons are your fastest way to make slides clear, consistent, and professional. Start with the basics (insert, align, format), then level up with Merge Shapes, SVG editing, and Slide Master templates. Keep styles simple, colours on-brand, and animations subtle. With a few habits, you’ll turn complex ideas into visuals your audience understands at a glance.
If you’d like hands-on practice, templates, and time-saving pro tips, join our courses:
- PowerPoint Introduction – Master layouts, shapes, icons, pictures, and clean slide design.
- PowerPoint Advanced – Build custom graphics, use the Slide Master, animate with confidence, and produce on-brand decks quickly.

