


How to Use Templates in Power Automate

Introduction
When you open Microsoft Power Automate for the first time, it can feel like there are too many options. Triggers, actions, connectors, conditions… where do you begin? Templates are the fastest and easiest way to start. A template is a pre-built flow that already has the steps in place. You fill in a few blanks (like which mailbox or SharePoint site to use), and you’re up and running in minutes.
In this guide, you’ll learn what templates are, where to find them, how to customise them safely, how to test and fix common errors, and how to turn a basic template into a reliable automation. You’ll also see best practices for naming, ownership, governance, and performance — so your flows remain tidy and trustworthy as your usage grows.
What is a Power Automate template?
A template is a ready-made flow designed for a common task. Examples include:
- Save email attachments to OneDrive or SharePoint
- Post a message to Teams when a file is added to a folder
- Send a daily summary email of new SharePoint items
- Collect Microsoft Forms responses and create Planner tasks
- Approve a document and notify stakeholders
Each template already includes a trigger (how the flow starts) and one or more actions (what the flow does). You connect your accounts (Outlook, SharePoint, OneDrive, Teams, Forms, Planner, etc.), pick locations (folders, lists, channels) and you’re ready.
Why templates help:
- Speed: You don’t start from a blank canvas.
- Consistency: They follow patterns that are known to work.
- Learning: You can open the flow and see how it’s built — great for learning design patterns.
Where to find templates
You can find templates in several places:
- Power Automate home
- Go to make.powerautomate.com → Home or Create → Browse templates.
- Search by app (Outlook, SharePoint, OneDrive, Teams, Forms), goal (“save attachments”, “send reminder”), or scenario (HR, finance, sales, IT).
- Connector pages
- When you open a connector (e.g., Outlook), you’ll see suggested templates that use it.
- From inside Microsoft 365 apps
- Some apps (like SharePoint lists) suggest templates when you choose Integrate > Power Automate.
Tip: Check the template’s publisher and reviews (if shown). Microsoft-published templates are a safe first choice.
Types of flows you’ll see in templates
- Automated cloud flow – starts from an event (e.g., when an email arrives; when a file is created).
- Instant cloud flow – runs on demand (a button you click).
- Scheduled cloud flow – runs at a time you set (daily, weekly, hourly).
- Approval flows – build on automated/instant flows to request approvals and capture outcomes.
Pick the template whose trigger matches how you want the flow to start.
Anatomy of a template (what to expect)
When you open a template, you’ll usually see:
- Trigger – e.g., When a new email arrives (V3), or When a file is created (SharePoint).
- Condition (optional) – often checks subject text, file type, or a field value.
- Apply to each (loop) – used when there may be multiple attachments or items.
- Actions – e.g., Create file, Send email, Post message in Teams, Create item, Start and wait for an approval.
- Dynamic content – tokens that pull data from earlier steps (Subject, From, File name, Link to item, etc.).
Understanding these blocks makes it easier to customise without breaking things.
Step-by-step: set up your first template
Let’s walk through a popular starter: Save email attachments to OneDrive and notify Teams.
1) Choose the template
- In Create > Browse templates, search attachments OneDrive Teams.
- Select a template like Save email attachments to OneDrive for Business and post to Teams (names vary).
- Click Continue.
2) Create or confirm connections
- You’ll be asked to sign into Outlook, OneDrive, and Teams (or confirm existing connections).
- If a connector is missing permissions, ask your IT admin to grant access.
3) Fill in key settings
- In the Outlook trigger, choose your Inbox (or a subfolder, if you filter invoices or reports).
- In Create file (OneDrive), pick a target Folder Path (e.g.,
/Finance/Invoices). - In the Teams step, choose Team and Channel to post the message.
4) Optional: add a simple filter
- Click the trigger’s ellipsis (…) > Settings or open Advanced options.
- Set Only with attachments = Yes, or add a Subject filter such as “Invoice”.
5) Save and test
- Click Save.
- Click Test (top right).
- Send a test email to yourself with an attachment matching your filter.
- Check Run history for success (green ticks). Confirm the file and the Teams post.
You’ve just deployed a working flow with minimal effort — thanks to the template.
Good customisations to apply to most templates
Templates are a starting point. Improve them with these simple tweaks:
A) Friendly messages and links
- In Teams or email actions, add clear text and clickable links.
- Example message body:
New invoice uploaded: @{triggerOutputs()?['body/subject']}Folder: https://yourtenant-my.sharepoint.com/personal/…/Finance/Invoices
B) Smarter file names
- Instead of only
Attachments Name, build a unique name:
formatDateTime(utcNow(),'yyyy-MM-dd') & " - " & triggerOutputs()?['body/subject'] & " - " & items('Apply_to_each')?['Name']
- This helps prevent overwriting and makes searching easier.
C) Conditions to reduce noise
- Add Condition: If Subject contains “Invoice” AND Has Attachments = true → then process; else Terminate gracefully or do nothing.
D) Basic error handling
- Add a Scope called “Try” with your main steps.
- Add a second Scope called “Catch” that runs After has failed.
- In Catch, use Compose to grab
outputs('Try')errors, and Send me an email or Post to Teams to alert you.
E) Ownership and naming
- Rename steps like Create OneDrive file – Invoice attachment (not just “Create file”).
- Name the flow with a clear, searchable title:
Finance – Save invoice attachments to OneDrive + notify Teams.
Template examples you can rely on
1) Forms → SharePoint → Confirmation email
- Trigger: When a new response is submitted (Forms)
- Actions: Get response details → Create item (SharePoint) → Send email to responder
- Why it’s great: Fast, reliable way to collect data and confirm submission.
- Customise: Add an optional Approval step; post to a Teams channel for visibility.
2) SharePoint file created → Post to Teams
- Trigger: When a file is created (properties only)
- Actions: Get file metadata → Post message to Teams with a link
- Customise: Limit to a specific folder; filter by file type.
3) Planner reminders (scheduled)
- Trigger: Recurrence (e.g., every weekday at 08:00)
- Actions: List tasks due today → Post to Teams or email you a summary
- Customise: Group by Bucket or Assignee; include direct links to tasks.
4) Approvals: request & record
- Trigger: New item in a list (“Request”)
- Actions: Start and wait for an approval → If approved, update status and notify
- Customise: Record outcome to a SharePoint list; notify requestor and owner.
Start with the template, then gradually personalise it to your process.
Testing, monitoring, and troubleshooting
Use “Test” and Run history
- Test lets you trigger the flow now (manually) or wait for the next event.
- Run history shows every run. Click a run to expand Inputs and Outputs.
- A red exclamation means the step failed — read the error message for details.
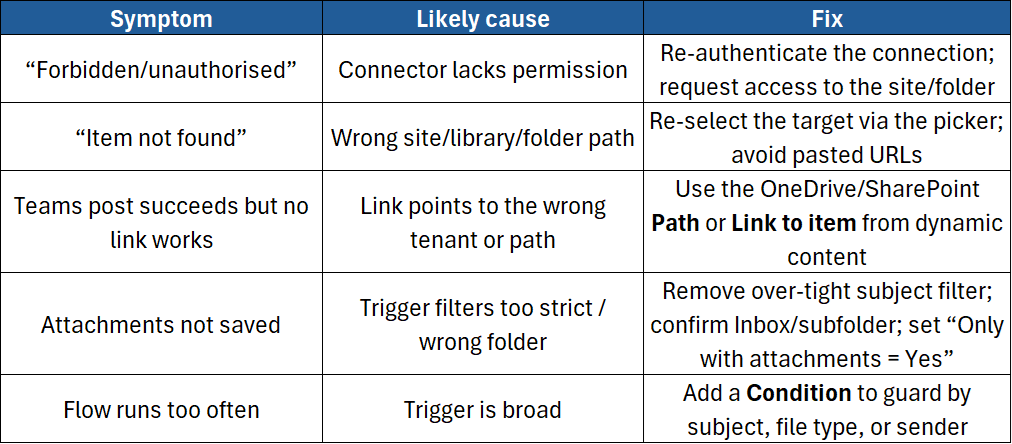
Common errors and easy fixes
Add safe-guards
- In Settings for the trigger or actions, set Retry policy conservatively if the connector sometimes throttles (e.g., SharePoint).
- For loops (Apply to each), set Concurrency only if the target actions don’t require strict order.
Making a template production-ready
Templates are great, but a few extra steps make them robust:
- Parameterise constants
- If you’ll reuse a flow across sites/environments, don’t hard-code paths.
- In solution-aware flows, use Environment variables for site URLs, list names, or folder paths.
- Document the flow
- In Details, add a short description: purpose, owner, data locations, creation date, change notes.
- Share ownership
- Add at least one co-owner (or a service account) so flows don’t stop if someone leaves.
- Limit permissions
- Ensure the flow uses the least-privileged accounts that still allow it to function.
- Be careful with guest access and external sharing.
- Track failures
- Create a lightweight logging list (FlowName, RunTime, Status, ErrorText).
- In Catch scope, Create item to log failures for later review.
Customising templates without breaking them
- Clone before big changes: Use Save As to create a copy. If your changes break, the original still works.
- Change one thing at a time: Make a small tweak → Save → Test.
- Avoid deleting the trigger: If you must change trigger type, it’s usually cleaner to start from a new template or a blank flow and copy steps across.
- Keep dynamic content aligned: If you swap a trigger, some tokens change name — re-insert them to avoid broken references.
Performance tips for template-based flows
- Filter early (in the trigger or first actions) so your flow runs only when needed.
- Avoid unnecessary “Get item/file” calls if the trigger already provides those details.
- Use Select / Filter array to shape data before loops.
- Batch operations when possible (e.g., SharePoint batch APIs in advanced scenarios).
- Pagination: If listing many items/files, turn on Pagination in the action settings with a sensible threshold.
Governance & environments (growing beyond a one-off)
As usage grows, you’ll hear about environments, DLP policies, and solutions:
- Environments: logical containers (e.g., Dev, Test, Prod). Build and test in Dev; move to Prod when stable.
- DLP (Data Loss Prevention): policies your admins set to control which connectors can share data. A template may work in one environment but be blocked in another.
- Solutions: package flows, environment variables, and related components for cleaner deployment and versioning.
You don’t need these for your first template — but they matter for professional, long-lived automations.
Security and compliance basics
- Don’t move sensitive data across connectors unless your policy allows it.
- Use sensitivity labels on files/libraries when appropriate.
- Keep approvals and audit logs in a system your org recognises (SharePoint list, Dataverse table, etc.).
- If a flow sends external emails, ensure content is appropriate and the sender address is controlled.
Example walk-through: Forms → Approval → SharePoint + Teams
This example shows how to turn a standard template into a small business process.
- Start with template: “Start approval when a new response is submitted (Forms)”.
- Connect to Forms and select your form.
- Add approvers: Use “First to respond” or “Everyone must approve.”
- On approval branch:
- Create a SharePoint item in a “Requests” list.
- Post a Teams message with the details and a link.
- On reject branch:
- Send a polite email to the requester with next steps.
- Test with a real response.
- Harden with a Try/Catch scope, failure notifications, and a short description in flow details.
You’ve turned a template into a small workflow with audit, communication, and next steps.
Maintenance routine (15 minutes per week)
- Check Run history for unexpected failures or timeouts.
- Review flows that ran more than expected — tighten filters to reduce noise.
- Confirm owners are still valid (people move teams).
- Archive or turn off flows you no longer need.
Conclusion
Templates are the best way to start with Power Automate: fast, simple, and full of proven patterns. Pick a template that matches your scenario, plug in your connections, then add small improvements — clearer messages, better file names, conditions, and basic error handling. As your confidence grows, you can turn templates into robust, production-ready flows with logging, ownership, and governance.
If you want expert guidance, real examples, and hands-on practice, join our instructor-led course:
- Microsoft Power Automate Introduction – Learn triggers, actions, conditions, approvals, error handling, solutions, and best practices for building reliable flows.

