


How to Organise Your Inbox in Microsoft Outlook
Introduction
An overflowing inbox can feel stressful. Important emails get buried, deadlines slip, and you spend too much time searching. The good news: Microsoft Outlook gives you powerful tools to organise messages quickly and keep your inbox under control.
This step-by-step guide shows you how to build a simple, reliable system using folders, categories, rules, flags, search folders, and more. You’ll learn how to file messages in seconds, surface the right emails at the right time, and keep your inbox tidy every day.
What “organised” looks like in Outlook
An organised inbox is not empty all the time — it’s under control. Here’s the end goal:
- Inbox = To review today (short list you’ll process during the day)
- Archive/Reference folders = Storage (everything you’ve already decided on)
- Tasks/Flags = Actions (items you need to do, with due dates)
- Calendar = Time commitments (meetings and deadlines)
- Search folders & categories = Fast views (find exactly what you need in seconds)
You’ll get there one building block at a time.
Step 1: Turn on Focused Inbox (or choose a simple view)
Focused Inbox separates incoming mail into Focused and Other.
- Turn on: View > Show Focused Inbox (Outlook desktop), or toggle in Settings (Outlook for Web).
- Train Outlook: move messages between Focused and Other; choose Always move to teach the system.
Prefer a single stream? Turn Focused Inbox off and rely on rules + categories instead. There’s no single “right” choice — pick the view that reduces your mental load.
Step 2: Use a lightweight folder structure
Keep folders simple so you don’t waste time deciding where things go.
Recommended layout:
- Inbox — today’s mail to process
- @Action — messages that require work soon (short-term)
- @Waiting — things you’re waiting on from others
- Archive (or Filed) — everything you’ve finished reading/deciding
- Projects (optional) — 3–7 active projects only
- Receipts / Finance / HR (optional) — for important records
Why simple wins: Search in Outlook is fast. Too many folders slows you down and increases mis-filing. Aim for under 10 top-level folders.
Step 3: File fast with Quick Steps (desktop)
Quick Steps are one-click actions. Create a Quick Step to Move to Archive, Move to @Action and mark as unread, Forward to manager, etc.
- Home > Quick Steps > Create New
- Choose actions (Move, Categorise, Flag, Mark as read, Forward…).
- Give it a short name and (optionally) a keyboard shortcut.
Example:
- Act — Move to @Action + Category: Red + Flag Today
- Archive — Move to Archive + Mark as read
This saves minutes every day and builds a consistent habit.
Step 4: Use Rules for automatic sorting
Rules handle repetitive routing so you don’t have to.
- File > Manage Rules & Alerts (desktop) or Settings > Mail > Rules (web).
- Common rules:
- Newsletters → move to Newsletters folder
- System alerts → move to Alerts
- Invoices → move to Finance/Invoices and Category: Finance
- “No-Reply” senders → Archive or Other
Tip: Keep rules simple. If you over-automate, you might miss important emails. Start with 3–5 high-value rules.
Step 5: Categories = colour-coding that works everywhere
Categories are labels with colours. They cut across folders and accounts, and they’re searchable.
- Assign a category: Home > Categorise (desktop), right-click a message, or set via rule.
- Rename colours: Categorise > All Categories (e.g., Red = Action, Blue = Clients, Green = Finance).
- Use one primary category per message (more only if helpful).
Why categories matter: You can later create Search Folders or quick searches for a category across your entire mailbox.
Step 6: Flag messages and convert to tasks (with reminders)
Flags turn emails into actions you won’t forget.
- Quick flag: Click the flag icon next to a message.
- Choose Today/Tomorrow/This week/Custom.
- See all flagged items: Tasks/To Do pane or Search Folder > Follow Up.
Power tip: Drag an email to the Tasks icon to create a standalone task with a link to the message. Add a due date and steps in the task body.
Step 7: Archive and Clean Up — keep the inbox lean
- Archive button (desktop/web) → moves to the Archive folder (easy to search later).
- Clean Up (Home tab) removes duplicate messages in long threads (keeps the latest with full history).
- Sweep (Outlook Web) gives simple bulk rules like “Keep latest message and delete the rest.”
Do not delete useful mail; archive it. Delete only spam or true junk.
Step 8: Search smarter (AQS: Advanced Query Syntax)
Find anything quickly using the search bar. Try these:
from:alicesubject:invoice AND hasattachments:yescategory:Financereceived:this week(alsoyesterday,last month,>01/10/2025)folder:archive project phoenixto:me isread:no
On desktop, open Search Tools to add filters: From, Subject, Has Attachments, Date Range.
Step 9: Create Search Folders (desktop)
Search Folders are “saved searches” that update automatically.
- Folder > New Search Folder.
- Examples:
- Unread Mail (across all folders)
- Flagged for Follow Up
- Mail from Specific People (your manager, key clients)
- Category: Finance
- Large Mail (to find space hogs)
Pin these to the top of your folder list for one-click views.
Step 10: Turn emails into calendar time
If an email needs time, schedule it.
- Drag the message to the Calendar icon (desktop): creates a new appointment with the email in the body.
- Or use Meeting from the email ribbon to invite others.
- Add a short title, location/Teams link, and clear description with bullets.
Your calendar is for time; your inbox is not. Move work to where it belongs.
Step 11: Tame notifications
Constant pings kill focus.
- File > Options > Mail > Message arrival: untick sounds, desktop alerts, taskbar envelope (choose what you truly need).
- On the web: Settings > Notifications.
- Mobile: enable Quiet hours/Quiet days in the app settings.
Set 2–4 check-in times each day for inbox processing instead of watching every email arrive.
Step 12: Create a daily inbox routine (15–30 minutes)
- Sort by From or By Date (your choice).
- For each message, decide in seconds:
- Delete junk
- Archive reference
- Reply in under 2 minutes
- Flag/Task if it needs more time
- Move to @Waiting if you’ve delegated or need a response
- Finish by checking Flagged/Tasks and your Calendar.
This builds momentum and keeps your inbox short.
Step 13: Shared mailboxes and delegation (if you use them)
- Shared mailbox: appears in your folder list; use categories and flags so the whole team sees status.
- Agree a simple team convention, e.g.:
- Red = In progress (owner’s initials in the subject)
- Blue = With client
- Green = Completed/Filed
- Turn on Show from if you need to send as the shared mailbox.
Consistency matters more than complexity.
Step 14: Attachments and cloud links (do this the smart way)
- Prefer OneDrive/SharePoint links instead of attaching heavy files.
- Use Attach > Browse Web Locations to keep a single source of truth.
- For incoming big attachments, save to the right SharePoint/OneDrive folder, then Archive the email.
Step 15: Retention, auto-archive, and mailbox size (check with IT)
Some organisations apply retention labels or auto-archive rules.
- Respect the policy. Don’t move regulated mail outside approved folders.
- Use Large Mail (Search Folder) to find and clean up huge items.
- Empty Deleted Items and Junk E-mail regularly.
Step 16: Keyboard shortcuts (speed boosters)
- New email:
Ctrl + N - Reply/Reply All/Forward:
Ctrl + R / Ctrl + Shift + R / Ctrl + F - Search:
Ctrl + E - Mark read/unread:
Ctrl + Q / Ctrl + U - Flag:
Insert - Archive (new Outlook / web):
Backspaceor Archive button - Move:
Ctrl + Shift + V - Quick Steps:
Ctrl + Shift + 1..9(if assigned)
Shortcuts + Quick Steps = seconds saved on every message.
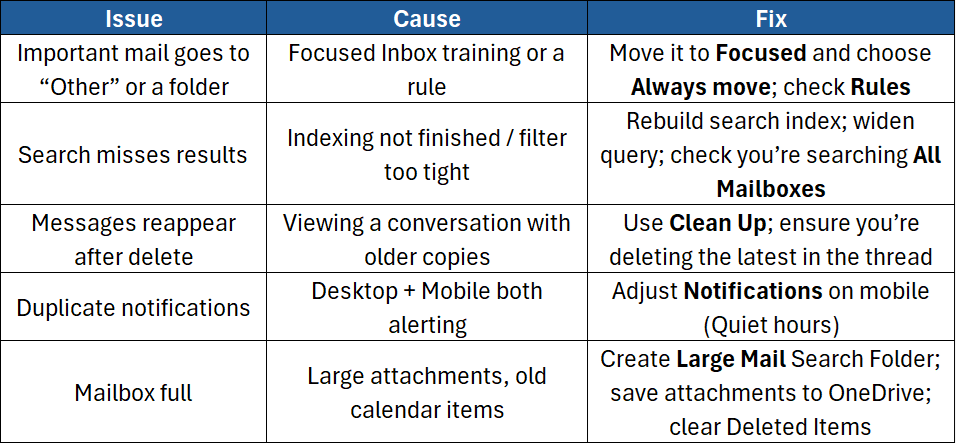
Step 17: Troubleshooting common issues
Putting it all together (your simple system)
- Focused Inbox ON (or OFF + rules — your choice).
- Folders: Inbox, @Action, @Waiting, Archive, plus 2–4 special folders.
- Quick Steps: Act (move + flag + category), Archive, Forward & File.
- Rules: newsletters and alerts out of the way.
- Categories: colour-code work streams (Action, Clients, Finance…).
- Flags/Tasks: capture actions with due dates.
- Search Folders: Unread, Flagged, From Manager, Category: Finance.
- Daily routine: 2–4 inbox check-ins, process to zero for today’s needs.
This combo gives you clarity, speed, and confidence.
Conclusion
A tidy inbox is not about perfection — it’s about control. With a simple folder structure, a few high-value rules, colour categories, Quick Steps, flags, and smart search, Outlook becomes a dependable command centre rather than a noisy to-do list.
If you’d like hands-on practice and expert tips to go further, join our instructor-led Outlook courses:
- Microsoft Outlook Level 1 – Master the essentials: navigation, email basics, calendars, contacts, and simple organisation.
- Microsoft Outlook Level 2 – Power tools: rules, Quick Steps, search folders, advanced search, templates, and productivity workflows.

