


How to Get Started with Power Apps
Introduction
Do you have a task that takes too long in Excel or email? Do people chase updates in chats and spreadsheets? Microsoft Power Apps helps you turn those everyday processes into easy-to-use apps — without needing to be a full-time developer. You can collect data, guide users through steps, and connect to tools you already use, like SharePoint, OneDrive, Teams, and Outlook.
In this beginner’s guide, you’ll learn what Power Apps is, the different types of apps, key building blocks (screens, controls, formulas, data sources), and a simple, step-by-step way to build your first app. We’ll also cover how to share your app, keep it fast, and avoid common mistakes. By the end, you’ll feel confident to create your first working solution.
What is Power Apps?
Power Apps is part of Microsoft’s Power Platform. It lets you build business apps with a visual designer and Excel-style formulas. Your apps run in a browser, the Power Apps mobile app, or inside Microsoft Teams.
Power Apps can connect to hundreds of services using connectors — including SharePoint, OneDrive, Excel, Outlook, Teams, Dataverse, SQL, and many more. You can start small and grow over time.
Three ways to build with Power Apps
- Canvas apps
- You design the layout like a slide in PowerPoint.
- Drag and drop buttons, forms, galleries, and charts onto screens.
- Great for task-driven apps with custom layouts (mobile or desktop).
- Model-driven apps
- You start from your data model in Microsoft Dataverse.
- The app creates views, forms, and charts for you.
- Best for more structured, process-focused apps (e.g., case tracking, asset registers).
- Power Pages (websites)
- Build secure websites that surface business data to internal or external users.
- Useful for supplier portals, booking pages, or customer self-service.
As a beginner, canvas apps are the easiest place to start. You’ll get quick wins and learn the core ideas.
Key concepts (the building blocks)
- Screen: A page in your app (Home, Edit, Success).
- Control: A UI element — Button, Label, Text input, Gallery (list), Form.
- Property: A setting for a control (e.g., a Button’s Text or OnSelect).
- Formula: Like Excel. Example:
Navigate(EditScreen, ScreenTransition.Fade)orIf(IsBlank(TitleInput.Text), Notify("Title required", NotificationType.Error)). - Data source: Where your data lives (SharePoint list, Excel table, Dataverse table, etc.).
- Variable: Holds a value temporarily.
- Context variable (screen-scoped):
UpdateContext({showPanel:true}) - Global variable (app-scoped):
Set(CurrentUser, User()) - Collections (in-memory tables):
Collect(Tasks, {Title:"New task"})
- Context variable (screen-scoped):
Pick a realistic first scenario
Choose something small but useful — for example:
- A simple issue tracker (Title, Description, Priority, Status).
- A site inspection form with photos and a pass/fail.
- A leave request form that emails your manager.
- A marketing request intake form routed to a shared mailbox or Planner.
If your team already stores data in SharePoint or Excel, use that as your first data source. It keeps things simple and familiar.
Step-by-step: Build your first canvas app (SharePoint example)
We’ll build a simple Issue Tracker that lists items, lets users add or edit an issue, and marks it as resolved.
1) Prepare your data (SharePoint)
Create a SharePoint List called Issues with the following columns:
- Title (Single line of text)
- Description (Multiple lines of text)
- Priority (Choice: Low, Medium, High)
- Status (Choice: New, In Progress, Resolved)
- AssignedTo (Person) – optional
- DueDate (Date) – optional
(You could also use an Excel Table stored in OneDrive. For beginners, SharePoint lists are more reliable for multi-user apps.)
2) Start the app
- Open make.powerapps.com.
- Select Create > Canvas app from blank.
- Choose Tablet for a wider layout or Phone for vertical.
- Name it Issue Tracker App.
3) Connect to data
- In the left panel, click Data (database icon) > Add data.
- Search SharePoint, select your site, and pick the Issues list.
4) Build the Browse (list) screen
- Insert a Gallery (Vertical). Set its Items property to:
SortByColumns(
  Filter(
    Issues,
    If(IsBlank(SearchBox.Text),
       true,
       StartsWith(Title, SearchBox.Text)
    )
  ),
  "Created",
  Descending
)
- Add a Text input above the gallery and rename it SearchBox. Set its HintText to “Search issues…”.
- Inside the gallery, show Title, Priority, and Status.
- Add a + New Button (top right). Set OnSelect to:
NewForm(EditForm1);
Navigate(EditScreen, ScreenTransition.Fade)
5) Build the Edit (add/update) screen
- Insert a Form control. Set DataSource to Issues and select fields you want to edit.
- Add a Save Button. Set OnSelect:
SubmitForm(EditForm1)
- Add a Cancel Button. Set OnSelect:
ResetForm(EditForm1);
Back()
- To switch between New and Edit mode when navigating from the list, set the Item property of the form to the selected gallery item on the Browse screen, e.g.:
BrowseGallery1.Selected
6) Open items from the list
On the Browse gallery’s OnSelect (or item TemplateFill), navigate to the Edit screen in edit mode:
EditForm(EditForm1);
Navigate(EditScreen, ScreenTransition.Fade)
7) Mark as resolved (quick action)
Add an Icon (tick) in the gallery. Set OnSelect:
Patch(
  Issues,
  ThisItem,
  { Status: "Resolved" }
);
Notify("Issue marked as Resolved", NotificationType.Success)
8) Confirm before delete
Add a Delete icon in the Edit screen. Set OnSelect:
If(
  Confirm("Delete this issue?"),
  Remove(Issues, EditForm1.LastSubmit);
  Back();
  Notify("Issue deleted", NotificationType.Success)
)
(If Confirm is not available in your environment, build a simple confirmation panel with a variable like UpdateContext({showConfirm:true}).)
9) Basic validation
Set DisplayMode of the Save button to:
If(EditForm1.Valid, DisplayMode.Edit, DisplayMode.Disabled)
Add required properties to key fields (e.g., Title must be required in the list and the form).
10) Improve the look and feel
- Use a simple colour palette and consistent font sizes.
- Space elements evenly; align left edges.
- Use icons plus text for clarity.
- Add a small Header component with app title and an Info icon that opens a help screen.
Make it responsive (works on mobile and desktop)
- In App settings > Screen size + orientation, turn on Scale to fit off (and Lock aspect ratio off) if you want to fully control layout.
- Use relative sizing where possible:
- A container’s Width might be
Parent.Width. - Two columns can be a horizontal Container with children whose Width is
Parent.Width/2 - 20.
- A container’s Width might be
- Use Flexible height galleries for lists that adapt to content.
- Test your app in both orientations if users switch between devices.
Add helpful features (small upgrades with big impact)
- Search & filters: Add a Dropdown for Status and filter the gallery:
With(
  { statusFilter: StatusDropdown.Selected.Result },
  If(
    statusFilter = "All" || IsBlank(statusFilter),
    Filter(Issues, StartsWith(Title, SearchBox.Text)),
    Filter(Issues, Status = statusFilter && StartsWith(Title, SearchBox.Text))
  )
)
- Sort toggle: Add an icon that switches between newest/oldest using a variable:
Set(SortDescending, !SortDescending)
- Then use
If(SortDescending, Descending, Ascending)in yourSortByColumns. - User defaults: Pre-fill AssignedTo with the current user on New:
If(
  EditForm1.Mode = FormMode.New,
  User().Email,
  ThisItem.AssignedTo.Email
)
- Attachments: Enable the Attachments card in the form so users can upload files to the list item.
Share, permissions, and environments
- Share the app: In Power Apps Studio, click Share, add people or security groups, and choose Can use or Can edit.
- Share the data: Users also need permission to the data source (e.g., SharePoint list). Ensure the list has the right access (read/edit) for your audience.
- Environments: Your organisation may have Dev / Test / Prod. Build in the right one and follow local policies.
- Solutions (next step): Package your app and related flows/tables for moving between environments with proper version control.
Keep it fast: performance tips
- Load only what you need: Filter on the server (e.g., Filter(SharePointList, Status="New")), not after pulling all rows.
- Avoid chaining loads inside loops; use Collect once if you need temporary data.
- Use delegation-friendly functions:
Filter,Sort,Search,StartsWithare usually delegable for SharePoint and Dataverse. If you see a blue “delegation warning”, rethink your formula or add indexed columns. - Limit controls per screen; too many can slow the app.
- Cache small lookup lists on app start:
ClearCollect(Priorities, Choices(Issues.Priority))
Accessibility and usability
- Provide AltText for images/icons that convey meaning.
- Ensure good colour contrast and a readable minimum font size (14–16 pt).
- Keep tap targets large on mobile (40–44 px high).
- Use error messages close to the field that needs attention.
- Set the TabIndex order so keyboard users can navigate logically.
Testing and versioning
- Use Play to test each screen.
- Try edge cases (blank fields, very long text, no network).
- Save versions with short notes like “v0.4 – added filter + validation”.
- If something breaks, you can Restore an older version of the app.
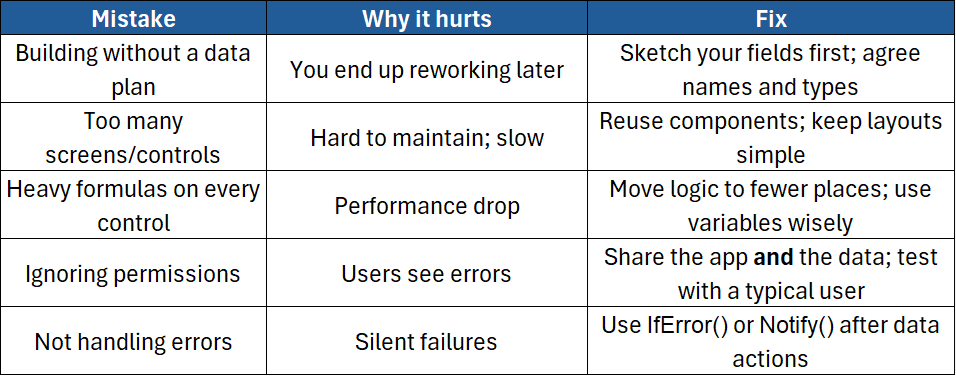
Common mistakes (and how to avoid them)
When your app grows: governance & next steps
- Dataverse: Consider moving beyond SharePoint when you need security roles, relationships, business rules, or audit history.
- Power Automate: Add flows for notifications, approvals, and scheduled jobs.
- Power BI: Add reports as tabs in Teams or embed visuals in your app.
- ALM: Use Solutions and environment variables for cleaner deployment across Dev/Test/Prod.
- Security: Follow your organisation’s data loss prevention (DLP) policies and sensitivity labels.
Conclusion
Power Apps makes it possible to turn everyday work into simple, friendly apps that your team will actually use. Start with a small problem, build a canvas app that reads and writes to a SharePoint list, add basic validation, and share it with your team. Little by little, you can add filters, approvals, and better data models — and soon you’ll wonder how you managed without it.
If you’d like expert, hands-on guidance to speed this up — including best practices, patterns, and real-world tips — join our course:
- Microsoft Power Apps Introduction – Build your first canvas app, connect to data, write core formulas, add forms and galleries, handle errors, and publish with confidence.

