


How to Add and Format Text Boxes in PowerPoint

Introduction
When you’re designing a PowerPoint presentation, text is one of the most important elements. It helps you explain ideas, emphasise key points, and support your visuals. But if you’ve ever struggled to place text exactly where you want it, the answer is simple — use text boxes.
A text box lets you insert text anywhere on a slide, independent of your layout placeholders. You can move it, resize it, add effects, and format it to match your design perfectly. Whether you’re creating a title, caption, or call-out shape, text boxes give you complete control.
In this guide, you’ll learn step by step how to add, format, and style text boxes in PowerPoint. We’ll also cover alignment, animation, and advanced formatting tips to help you create professional-looking slides that stand out.
What Is a Text Box in PowerPoint?
A text box is a container that holds text on a slide. Unlike preset placeholders that appear in PowerPoint templates (like “Click to add title”), text boxes are completely customisable. You can add them anywhere and use as many as you need.
Text boxes are especially useful for:
- Adding labels or captions to images
- Creating diagrams or infographics
- Highlighting quotes or key figures
- Building custom slide layouts
Step 1: Adding a Text Box
To insert a new text box:
- Go to the Insert tab on the ribbon.
- Click Text Box in the Text group.
- Click anywhere on your slide — or click and drag to draw a text box.
- Start typing your text.
PowerPoint automatically adds a box around the text. You can move, resize, and format it freely.
Tip: If you click instead of dragging, PowerPoint creates a box that expands as you type. Dragging creates a fixed-size box that wraps text automatically.
Step 2: Moving and Resizing Text Boxes
To move a text box:
- Click the border of the text box (your cursor becomes a four-sided arrow).
- Drag it to a new position.
To resize a text box:
- Select it, then drag one of the small white handles on the corners or sides.
- Drag inward to make it smaller, or outward to make it larger.
For precise control, use the Size & Position pane:
- Right-click the box and select Size and Position.
- Enter exact height, width, or coordinates.
Step 3: Adding Multiple Text Boxes
You can use several text boxes on one slide to organise information.
Example layout:
- One box for a title
- One for key points
- One for a supporting quote
This approach helps break up content visually and keeps slides tidy.
Step 4: Formatting Text
Once you’ve added text, you can format it just like any other text in PowerPoint.
Select the text, then use the Home tab to:
- Change the font and size
- Apply bold, italic, or underline
- Change the font colour
- Adjust alignment (left, centre, right, justified)
- Modify line spacing under Paragraph → Line Spacing Options
You can also use the Mini Toolbar that appears when you right-click text — a quick way to change font and colour without moving your mouse to the ribbon.
Step 5: Changing Text Box Backgrounds
Text boxes don’t have a background by default, but you can add one to make your text stand out.
- Click the border of your text box (not inside it).
- Go to the Shape Format tab.
- Click Shape Fill and choose a colour, gradient, picture, or pattern.
- To remove the fill, select No Fill.
You can also add transparency using More Fill Colors → Transparency Slider, which is useful when placing text over an image.
Step 6: Adding Borders and Effects
You can style text boxes just like shapes:
- Shape Outline – Add or change the border colour and thickness.
- Shape Effects – Add shadows, reflections, glows, soft edges, or 3-D effects.
For example:
- A subtle grey outline adds contrast against a light background.
- A shadow effect can make your text pop.
To apply an effect:
- Select the text box.
- Go to Shape Format → Shape Effects.
- Choose from Shadow, Glow, Reflection, etc.
Step 7: Aligning Text Boxes
Alignment is key to a professional look. PowerPoint offers tools to make it easy:
- Select multiple text boxes (hold Shift and click each one).
- Go to Shape Format → Align.
- Choose from:
- Align Left / Centre / Right
- Align Top / Middle / Bottom
- Distribute Horizontally / Vertically
You can also align text boxes to the slide itself:
- Choose Align → Align to Slide, then select your alignment option.
Tip: Turn on Gridlines and Guides (via View → Show group) for perfect alignment.
Step 8: Rotating Text Boxes
Sometimes you’ll want text at an angle — perhaps for a design element or a diagonal label.
To rotate a text box:
- Click the text box to select it.
- Drag the rotation handle (the circular arrow above the box).
- Or use Shape Format → Rotate → More Rotation Options for precise control.
You can even flip text horizontally or vertically for creative effects.
Step 9: Text Box Margins and Wrapping
Inside every text box are invisible margins that control how close text sits to the edges.
To adjust these:
- Right-click the text box border → choose Format Shape.
- In the Text Options pane, click Text Box (the icon with lines).
- Under Internal Margin, change the Top, Bottom, Left, and Right settings.
This is useful if your text feels cramped or too spaced out.
You can also control text fitting:
- Do Not Autofit – Keeps box size fixed.
- Shrink Text on Overflow – Reduces text size to fit.
- Resize Shape to Fit Text – Expands box automatically.
Step 10: Copying and Duplicating Text Boxes
To reuse a text box:
- Select it and press Ctrl + C (Copy) and Ctrl + V (Paste).
- Or press Ctrl + D to duplicate instantly.
This keeps formatting consistent across multiple slides.
You can also use the Format Painter tool to copy text box styles:
- Select a formatted text box.
- Click Home → Format Painter.
- Click another text box to apply the same formatting.
Step 11: Layering Text Boxes with Other Objects
Text boxes often sit alongside images, shapes, or charts. PowerPoint lets you layer and order them:
- Select the text box.
- Right-click → Bring to Front or Send to Back.
You can also use Arrange on the Shape Format tab to layer multiple objects neatly.
Step 12: Grouping Text Boxes
If you’ve created several text boxes that belong together — for example, a title and subtitle — group them so they move as one unit.
- Select all boxes (hold Shift and click each).
- Right-click → Group → Group.
Now, when you move or resize, all grouped items stay together.
Step 13: Adding Animation to Text Boxes
You can make text boxes appear, fade in, or move across the screen.
- Select the text box.
- Go to the Animations tab.
- Choose an entrance effect (like Appear, Fade, or Fly In).
- Adjust timing using the Animation Pane.
Animations can help guide the viewer’s focus — but use them sparingly for a professional finish.
Step 14: Adding Text Boxes to the Slide Master
If you want a text box to appear on every slide (for example, a footer or slogan):
- Go to View → Slide Master.
- Select the master layout or a specific slide layout.
- Insert and format your text box.
- Exit Slide Master view.
Your text box now appears consistently across all slides that use that layout.
Step 15: Tips for Professional-Looking Text Boxes
- Stick to 1–2 fonts per presentation for consistency.
- Use contrast — dark text on light backgrounds or vice versa.
- Align elements using guides for symmetry.
- Keep text minimal — aim for six lines or fewer per slide.
- Avoid overcrowding — white space makes slides easier to read.
These small details make a big difference when presenting to clients, colleagues, or students.
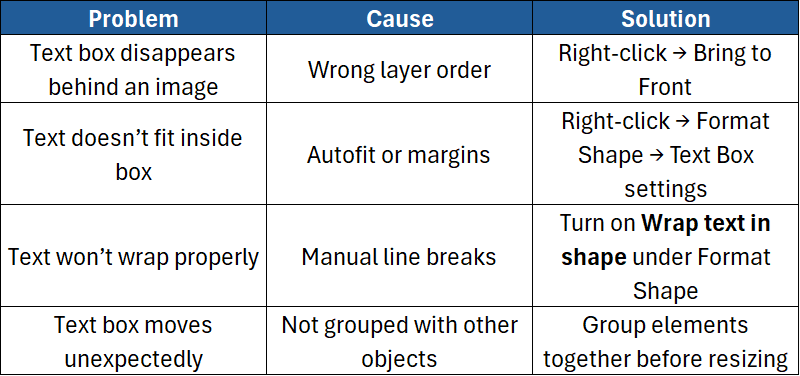
Step 16: Troubleshooting Common Issues
Step 17: Using Text Boxes Creatively
Once you’re confident, text boxes can become design features rather than just containers. Try:
- Overlaying text on images with transparent backgrounds
- Combining text with icons or shapes
- Creating infographics using aligned boxes
- Adding quotes or statistics with coloured backgrounds
Creative layouts make your slides visually engaging and memorable.
Conclusion
Text boxes are one of the most flexible and useful tools in PowerPoint. They let you control exactly where and how text appears, helping you design clear, professional, and visually balanced slides.
In this guide, you learned how to:
- Add and move text boxes
- Format text and backgrounds
- Align, group, and animate text boxes
- Apply consistent styles using the Slide Master
Once you’ve mastered text boxes, you’ll find it easier to design presentations that look polished and communicate your message effectively.
If you want to build your PowerPoint skills further, ExperTrain offers expert-led training for every level:
- PowerPoint Introduction – Learn how to create slides, use layouts, add images, and work with text boxes confidently.
- PowerPoint Advanced – Master advanced design, transitions, animation, and custom slide templates.
With professional training, you’ll learn how to create engaging presentations that look sharp, consistent, and ready to impress.

