


How to Freeze Panes and Split Windows in Excel

When you’re working with large spreadsheets in Excel, scrolling can make it difficult to keep track of your column headings or key data. That’s where Freeze Panes and Split Windows come in. These two features make it much easier to navigate big worksheets by locking rows or columns in place, or by creating multiple scrollable sections of the same sheet.
In this guide, we’ll show you step by step how to use both Freeze Panes and Split Windows, highlight the differences between them, and explain when to use each.
👉 If you’re new to Excel, these features are covered in our Microsoft Excel Introduction Course, where you’ll learn essential navigation tools for working with spreadsheets.
Why Use Freeze Panes and Split Windows?
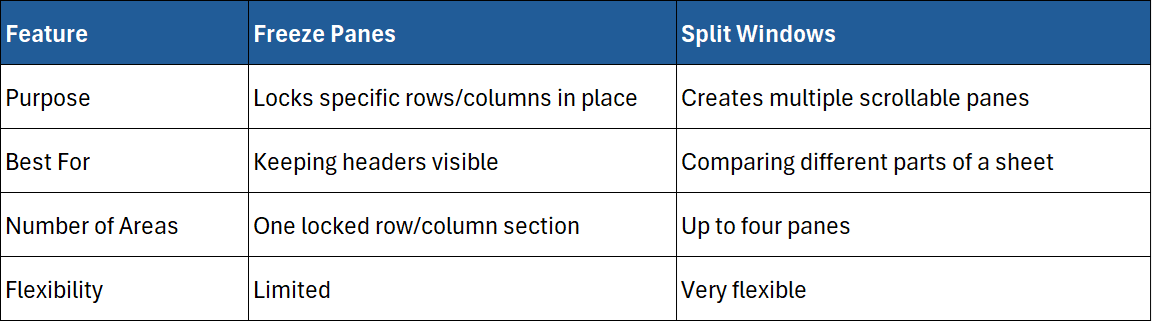
- Freeze Panes keeps specific rows or columns visible while you scroll. Perfect for locking column headings at the top of your sheet.
- Split Windows divides the window into separate panes so you can scroll different sections independently. Ideal for comparing distant data without losing your place.
These features help you:
- Save time when working with large datasets.
- Improve accuracy by always keeping key labels visible.
- Compare information more easily.
Understanding Freeze Panes
Freeze Panes is all about “locking” parts of your worksheet.
Options Available
Under View > Freeze Panes, you’ll see three choices:
- Freeze Panes – locks both rows above and columns to the left of your active cell.
- Freeze Top Row – keeps the very top row visible.
- Freeze First Column – keeps the first column visible.
Example
- If you have column headings in row 1, use Freeze Top Row to keep them visible while scrolling down.
- If your sheet includes employee names in the first column, use Freeze First Column so you can always see names while scrolling across.
👉 These basics are taught in the Excel Introduction Course, where you’ll practise using Freeze Panes for common data-entry scenarios.
How to Use Freeze Panes
- Select the right cell
- Click the cell below the row(s) and to the right of the column(s) you want to keep visible.
- Example: Click B2 to freeze row 1 and column A.
- Apply Freeze Panes
- Go to View > Freeze Panes > Freeze Panes.
- Scroll to test
- You’ll see row 1 and column A remain visible while the rest of the sheet scrolls.
- Unfreeze Panes
- Go back to View > Freeze Panes > Unfreeze Panes to reset.
Understanding Split Windows
Split Windows allows you to divide the worksheet into two or four scrollable areas. Each pane can scroll independently.
Example Uses
- Compare data in row 10 with row 1,000 without scrolling back and forth.
- View totals at the bottom of the sheet while entering data at the top.
👉 Split Windows is also introduced in the Excel Introduction Course, helping beginners handle large sheets more effectively.
How to Use Split Windows
- Go to View Tab
- Click View > Split.
- Split by Selection
- Place your cursor in a cell, e.g., B10, and Excel will create splits above and to the left of that cell.
- You’ll now have four panes.
- Move the Splits
- Drag the split bars to adjust where panes start and end.
- Remove the Split
- Go back to View > Split to toggle it off.
Freeze Panes vs Split Windows: Key Differences
👉 Both tools are covered in our Excel Introduction Course, with additional productivity tips in the Excel Intermediate Course.
Practical Examples
Example 1: Freezing Headings
A sales dataset with thousands of rows – use Freeze Top Row so you always see the column labels.
Example 2: Comparing Budgets
Split the window horizontally to compare income at the top of the sheet with expenses listed at the bottom.
Example 3: Data Entry with Names
Freeze the first column with employee names while entering monthly figures across many columns.
Tips for Using Freeze Panes and Split Windows
- Always select the correct starting cell before freezing panes.
- Don’t use both features at once — choose one depending on the task.
- When collaborating, explain which rows/columns are frozen so others don’t get confused.
- Use Tables and Filters alongside Freeze Panes for even more control over large datasets.
Related Excel Features Worth Learning
- Tables – automatically expand and make filters more reliable. (Excel Intermediate Course)
- Conditional Formatting – highlight important data. (Excel Intermediate Course)
- PivotTables – summarise and analyse large datasets. (Excel Intermediate & Advanced Courses)
Final Thoughts
Freeze Panes and Split Windows are simple but powerful tools in Excel. They help you manage large worksheets more effectively, keeping important information visible and allowing you to compare data quickly.
👉 If you’re just starting out, the Excel Introduction Course is the best place to learn Freeze Panes, Split Windows, and other essential navigation tools.
👉 As you grow more confident, the Excel Intermediate Course builds on these basics with Tables, conditional formatting, and advanced data management.
By mastering these techniques, you’ll save time, avoid errors, and work more efficiently in Excel.

