


How to Create Your First Flow in Power Automate

Introduction
Do you spend time doing the same tasks again and again? Downloading attachments, copying data between apps, sending reminders? Microsoft Power Automate helps you automate those steps so they happen for you — on a schedule, when a trigger happens, or with a button press.
In this beginner-friendly guide, you’ll build your first flow and learn the core ideas that make Power Automate so useful: triggers, actions, connectors, dynamic content, conditions, and error handling. By the end, you’ll be able to design simple automations that save time every day.
What is Power Automate?
Power Automate is part of Microsoft Power Platform. It links your apps and services (Microsoft 365, SharePoint, Outlook, Teams, OneDrive, Planner, Forms, plus hundreds of third-party tools) so they can pass data and run steps automatically. You create flows that:
- Start with a trigger (e.g., “When an email arrives”).
- Run a set of actions (e.g., “Save the attachment to OneDrive”, “Post a message in Teams”).
- Use conditions to decide what happens next.
You don’t need to be a developer. If you can outline the steps of a task, you can usually build the flow.
Flow types (which one should I pick?)
Power Automate offers several flow types. For your first build, focus on these:
- Automated cloud flow – Starts from an event (trigger).
Example: “When a file is added to SharePoint, alert the team.” - Instant cloud flow – Runs on demand by clicking a button (desktop, mobile, or inside Power Automate).
Example: “Create a Planner task for this email.” - Scheduled cloud flow – Runs at times you choose.
Example: “Every weekday at 8:00, send me a summary of new items.” - Approval flow (built from the above) – Sends an approval card, waits for a decision, then continues.
Example: “When a request is submitted, ask a manager to approve.”
There are also Desktop flows (for RPA) and Business process flows (for guided stages in Dynamics/Dataverse), but we’ll keep things simple here.
Before you start: a quick checklist
- Environment: Use your default environment unless your organisation has set up others.
- Connections: You’ll be asked to sign in to apps (Outlook, SharePoint, OneDrive, Teams).
- Location of data: Know which site/library/list/folder you’ll use.
- Naming: Choose a clear name for your flow (e.g., “Save invoice attachments to OneDrive and alert Finance”).
A great first project: Save email attachments to OneDrive and notify Teams
This popular example shows all the basics in one go: trigger, actions, condition, dynamic content, and a friendly notification.
What you’ll build
- Trigger: When a new email arrives in Outlook.
- Actions:
- If the email has an attachment and the subject contains “Invoice”, save the attachment to a OneDrive folder.
- Post a message in a Teams channel with a link to the file.
Step-by-step
- Create the flow
- Go to make.powerautomate.com → Create → Automated cloud flow.
- Name it Save invoice attachments to OneDrive + notify Teams.
- Choose trigger When a new email arrives (V3) (Outlook).
- Configure the trigger
- Mailbox: Me.
- Folder: Inbox (or a subfolder if you already route invoices).
- Add an Advanced options filter if you like (e.g., Only with attachments = Yes).
- Save.
- Add a condition
- Click + New step → Condition.
- In the left box, click Dynamic content and choose Subject.
- Operator: contains.
- Right box: type Invoice.
- This means: only continue if the subject contains the word “Invoice”.
- In the ‘If yes’ branch: save the attachments
- Click Add an action under If yes.
- Action: Apply to each → choose Attachments from dynamic content.
(Power Automate auto-wraps attachment steps in a loop because there may be more than one.) - Inside the loop, add action Create file (OneDrive for Business).
- Folder Path: e.g.,
/Finance/Invoices(create it once in OneDrive if it doesn’t exist). - File Name: use Attachments Name.
- File Content: use Attachments Content.
- Folder Path: e.g.,
- Post to Teams
- Still in If yes, add an action Post a message in a chat or channel (Teams).
- Post as: Flow bot.
- Post in: Channel.
- Team and Channel: Choose your Finance channel.
- Message: For example:
New invoice received: @{triggerOutputs()?['body/from']} | Subject: @{triggerOutputs()?['body/subject']}
Add a link to OneDrive folder (static) or include the file path if you want to be fancy (we’ll keep it simple).
- Still in If yes, add an action Post a message in a chat or channel (Teams).
- In the ‘If no’ branch
- Optional: Do nothing, or log to a spreadsheet, or send a polite rejection message. For a first build, you can leave it empty.
- Save and test
- Click Save.
- Click Test (top right) → choose Manually → send yourself a test email with an attachment and the word “Invoice” in the subject.
- Check the Run history to see each step and whether it succeeded.
- Confirm the file is in OneDrive and the Teams message posted.
Congratulations — that’s your first working flow!
Understanding core building blocks
Triggers
A trigger starts your flow. Popular choices:
- Outlook: When a new email arrives
- SharePoint: When an item is created
- OneDrive: When a file is created
- Forms: When a new response is submitted
- Planner: When a task is created
- Teams: When keywords are mentioned (via connectors and Power Virtual Agents, where available)
Each trigger has settings (e.g., folder, filter, include attachments). Use them to narrow down when your flow runs.
Actions
Actions do the work: create files, send emails, update lists, post messages, start approvals, write rows to Excel/Dataverse, and more. Connectors define which actions are available.
Connectors
Connectors are the “bridges” to apps/services. Microsoft 365 services are standard connectors; many third-party apps are also available. (Your organisation may restrict some connectors for data protection — check your policy if something is blocked.)
Dynamic content
Dynamic content pulls values from earlier steps (subject, sender, file name, list fields). Click Dynamic content to insert tokens into fields. This is how you pass data through your flow.
Expressions
Expressions let you transform data. Common examples:
toLower(triggerOutputs()?['body/subject'])– lower-case a subject.contains(items('Apply_to_each')?['Name'], '2025')– check if a filename includes “2025”.formatDateTime(utcNow(),'dd/MM/yyyy')– today’s date in UK format.coalesce(item()?['CustomerName'], 'Unknown')– default if blank.
Click Expression next to Dynamic content to add these.
Conditions, switches, and loops
- Condition – If/Else logic (like our invoice check).
- Switch – Multi-way branch based on a single value (great for status fields).
- Apply to each – Loop through arrays (attachments, list items, table rows).
- Do until – Loop until a condition is true (use with caution, add a timeout).
Parallel branches let you do independent tasks at the same time (e.g., save files and notify Teams in parallel).
Approvals in a nutshell
Approvals are a popular pattern:
- Trigger (e.g., a new SharePoint item).
- Start and wait for an approval → choose Approve/Reject – First to respond or Everyone must approve.
- Based on the outcome, continue the flow (create a record, send email, or post to Teams).
Approvals produce rich cards in Outlook and Teams and keep a history you can report on.
Testing and monitoring
- Test button: run manually with sample data or wait for the next trigger.
- Run history: drill into each step to see inputs/outputs. Red means failed — click to read the error.
- Peek code (ellipsis on an action): shows the raw structure of the step, useful for advanced troubleshooting.
- Turn on/off: toggle the flow if you need to pause it.
Error handling (simple but powerful)
Even the best flow can hit a problem (missing file, moved folder, permission change). Add basic protection:
- Configure run after (ellipsis on an action) to run a step on failure or on timeout.
Example: If saving a file fails, send yourself an email with the error. - Scope + “try/catch” pattern:
- Scope – Try: main steps.
- Scope – Catch (run after = has failed): log the error, notify Teams/email.
- Terminate action: end the flow with a clean status and a clear message if needed.
Performance tips (to keep flows fast and reliable)
- Filter early: Use trigger filters (subject contains, folder, query) so the flow runs only when needed.
- Limit loops: If you expect many items, consider a Filter array first.
- Pagination: Some actions return a limited number of items; enable Pagination in the action settings and set a sensible threshold.
- Concurrency: For heavy Apply to each loops, you can increase Concurrency control to process items in parallel (be careful with actions that must run in order).
- Avoid unnecessary Gets: Use outputs from the trigger/action instead of adding another “Get item/file” if you already have the data.
Naming and documentation (future you will say thanks)
- Name steps clearly: “Create OneDrive file – Invoice attachment” beats “Create file”.
- Add notes in the Description of the flow and key actions (what, why, owner).
- Versioning: When you change a flow, note the date and the reason in the description or a simple change log.
Solutions, environment variables, and sharing (when you’re ready)
- Solutions: Package flows (and related resources) for export/import between environments (e.g., Dev → Test → Prod).
- Environment variables: Store things like SharePoint site URLs or folder paths so you don’t hard-code them.
- Share: Give others access to edit or run the flow; set Owners for continuity.
- Connections: Flows run under your connections; if you leave the organisation, ownership must be transferred.
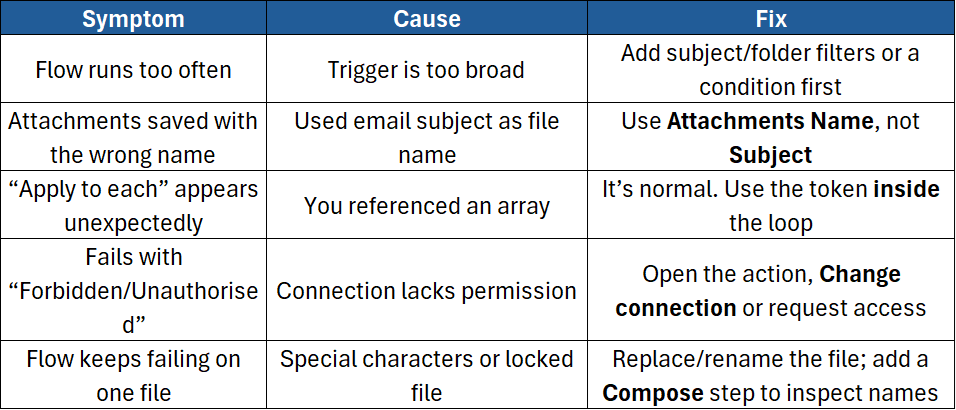
Common beginner mistakes (and easy fixes)
More beginner-friendly flow ideas
- Forms → SharePoint list + confirmation email
When a Form is submitted, create a SharePoint item and send a formatted email to the requester. - Planner reminders
Every morning at 8:00, find Planner tasks due today and post a summary to Teams. - SharePoint library alerts
When a new file is added to a client folder, tag it and notify the account manager. - Daily KPI snapshot
On a schedule, read figures from an Excel file and post a dashboard image or numbers to Teams.
Each example uses the same core ideas: trigger → actions → conditions → outputs.
Best practices checklist
- Keep names short and descriptive (Flow name, action names).
- Filter as early as possible.
- Use dynamic content first; only add expressions when you must.
- Handle errors with run after and Scope blocks.
- Store constants (URLs, folder paths) in environment variables if using solutions.
- Share ownership with a colleague or a service account for resilience.
- Review Run history weekly to catch silent failures early.
- Respect your organisation’s data loss prevention policies when mixing connectors.
Conclusion
Power Automate is a practical way to cut out repetitive work. You’ve seen how to build a starter flow that saves email attachments and alerts your team, and you’ve learned the core skills that apply to almost any automation: picking the right trigger, adding actions, using dynamic content, setting conditions, and adding basic error handling.
Want to learn the smart patterns that professionals use — approvals, advanced expressions, governance tips, and real-world project examples? Join our hands-on, instructor-led course:
- Microsoft Power Automate Introduction – Build confidence with triggers, actions, conditions, approvals, error handling, and best-practice design so you can automate everyday tasks with ease.

