


How to Protect Worksheets and Workbooks in Excel

Introduction
Spreadsheets often hold important numbers, formulas, and decisions. If someone changes a formula by mistake, sorts the wrong column, or deletes a sheet, the results can be costly. The good news: Excel gives you several layers of protection so you can keep your work safe while still letting people do what they need.
In this guide you’ll learn:
- The difference between worksheet protection, workbook protection, and file encryption
- How to lock cells, hide formulas, and allow edits only where you want them
- How to protect the workbook structure (stop renaming, moving, or deleting sheets)
- How to encrypt a file with a password (so only authorised people can open it)
- How to work with tables, PivotTables, data validation, and sorting on protected sheets
- Best practices, gotchas, and a quick checklist
Plain truth: Worksheet and workbook protection is about preventing accidental changes, not military-grade security. For true security, use file encryption (password to open) and store files in a secure location (OneDrive/SharePoint with correct permissions).
The three protection layers in Excel (know what each one does)
- Worksheet protection (Protect Sheet)
- Controls what users can do on a sheet: select cells, edit locked cells, format, insert/delete rows or columns, sort, use AutoFilter, edit objects, and more.
- Requires you to lock the cells you want to protect (locked is the default) and unlock the ones users may edit.
- Workbook protection (Protect Workbook > Structure)
- Locks the structure of the file: prevents inserting, deleting, renaming, moving, hiding, or unhiding sheets.
- Does not stop cell edits on sheets (that’s worksheet protection).
- File protection (Encrypt with Password)
- Adds a password to open the file. This is encryption. Without the password, the file contents can’t be viewed.
- Strongest option for confidentiality.
Think in layers: Encrypt if the file is private, Protect Workbook to guard the sheet list, Protect Sheet to control actions on each sheet.
Step 1 — Decide what users should be able to do
Before clicking any buttons, plan the experience:
- Which cells can users edit (e.g., input cells)?
- Which cells must be locked (e.g., formulas, headings, totals)?
- Can they sort or filter?
- Do they need to insert rows, format cells, or use PivotTables?
- Do you want to hide formulas (so they see results, not the logic)?
Make a short list. You’ll turn these into settings.
Step 2 — Unlock the input cells (so they remain editable after protection)
By default, every cell is “Locked”—but this only has an effect when the sheet is protected. So you first unlock the places where editing is allowed.
- Select your input range(s).
- Press Ctrl+1 (Format Cells) → Protection tab.
- Untick Locked (and leave Hidden unticked unless you also want to hide formulas here).
- Click OK.
Tip: Use a consistent fill colour (e.g., light yellow) for input cells so users know where to type.
Step 3 — (Optional) Hide formulas in sensitive cells
If you don’t want users to see how totals are calculated:
- Select the formula cells.
- Press Ctrl+1 → Protection tab.
- Tick Hidden (and keep Locked ticked).
- After you protect the sheet, the formula bar will show nothing for those cells (only results).
Step 4 — Turn on worksheet protection with the right options
- Go to Review tab → Protect Sheet.
- Enter a password if you want to prevent others from turning protection off.
- Password is optional. Without a password, anyone can unprotect, but it still stops accidents.
- Tick what users are allowed to do while the sheet is protected. Common choices:
- Select unlocked cells (yes)
- Select locked cells (usually yes, so they can see the sheet)
- Format cells (usually no for strict models; yes if you trust users)
- Sort (tick if your model needs sorting)
- Use AutoFilter (tick if you’ve applied filters)
- Insert/Delete rows (only if your design supports it)
- Edit objects (tick if users must change shapes, charts, or slicers)
- Edit scenarios (for Scenario Manager users)
- Click OK and confirm the password (if used).
Tip: If Sort or AutoFilter don’t work after protection, you either didn’t tick them or the list includes locked header cells that prevent the action. Make sure headers/filters are set up correctly.
Step 5 — Allow Edit Ranges (give access to part of a protected sheet)
You can let people edit certain cells (with or without a separate password) even while the sheet is protected:
- Review > Allow Users to Edit Ranges.
- Click New and define a range (e.g.,
Input_ThisMonth). - Optionally set a range password (different from the sheet password).
- You can also assign specific users/groups (on enterprise setups) who can edit without a password.
- Click Protect Sheet to apply.
Great for shared templates where finance can edit blue cells and operations can edit green cells, all on the same sheet.
Step 6 — Protect the workbook structure (stop sheet changes)
To prevent people from renaming, moving, hiding, or deleting sheets:
- Go to Review > Protect Workbook.
- Tick Structure.
- Add a password (optional) and click OK.
Now your list of sheets is stable. Users can still edit cells per your sheet protection settings.
Note: Protect Workbook does not encrypt the file. It only locks the sheet list and their order.
Step 7 — Encrypt the file with a password (stop unauthorised viewing)
If the file contains sensitive data, add a password to open:
- Go to File > Info.
- Click Protect Workbook (in the centre pane) → Encrypt with Password.
- Enter a strong password and confirm.
- Save the file.
From now on, Excel will ask for this password before opening the workbook.
Warning: If you forget this password, the content is not recoverable. Store it safely.
Step 8 — Work with tables, filters, slicers, and PivotTables on protected sheets
Excel Tables and filters
- If your sheet is protected and you want users to filter a table, tick Use AutoFilter when protecting the sheet.
- If they need to sort, tick Sort as well.
- Inserting rows into a table on a protected sheet can be tricky. Design your model so users don’t have to change the structure, or provide an unprotected data entry sheet that feeds protected reports.
Slicers and objects
- Slicers and shapes are “objects”. To let users use them or reposition them, tick Edit objects in Protect Sheet.
PivotTables
- Users can refresh and filter a PivotTable on a protected sheet if you:
- Set the PivotTable → PivotTable Analyze > Options > Data tab → tick Enable show details if needed;
- Protect the sheet and tick Use PivotTable reports / Use AutoFilter (wording varies by version).
- If the PivotTable lives on a separate unprotected sheet, keep calculations protected on other sheets while leaving the Pivot page flexible.
Step 9 — Lock down named ranges, dashboards, and navigation
- Named ranges: define clear input/output names (Formulas > Name Manager). Lock outputs, unlock inputs.
- Dashboards: Put charts and visuals on a protected sheet (tick Edit objects off if you don’t want movement). Use slicers only if you’re happy for users to filter.
- Navigation: Consider shapes (buttons) linked to macros or hyperlinks; lock positions by protecting the sheet with Edit objects unticked.
Step 10 — Hide or protect sheets and very hidden mode
- Hide a sheet: right-click the sheet tab → Hide.
- Unhide: right-click any tab → Unhide.
- Very hidden (advanced): in the VBA editor (Alt+F11), set the sheet’s Visible property to
xlSheetVeryHidden. It can only be unhidden via VBA.- Still not true security; use encryption for secrets.
Step 11 — Protect your formulas and logic (without stopping normal work)
- Keep formulas on one calc sheet (protected, formulas hidden).
- Keep inputs on one input sheet (unlocked cells).
- Keep output tables/charts on report sheets (protected).
- Hide helper columns by setting Hidden + Locked, then protect the sheet.
- Prevent accidental sorting of calc ranges by not ticking Sort on those sheets.
Step 12 — Password hygiene and version control
- Use different passwords for different layers (sheet vs workbook structure vs encryption).
- Share passwords out of band (not inside the file).
- Maintain a version number and a change log sheet (date, change, owner) so you can trace edits.
- Consider publishing a protected read-only copy for end users and keeping an editable master safely stored.
Step 13 — How protection interacts with co-authoring (OneDrive/SharePoint)
- Co-authoring lets multiple users edit at once.
- Sheet protection still works, but if many people need to edit the same range, consider Allow Edit Ranges or move editable parts to a dedicated data entry sheet.
- Permissions (who can open the file) are controlled by SharePoint/OneDrive sharing, separate from Excel protection.
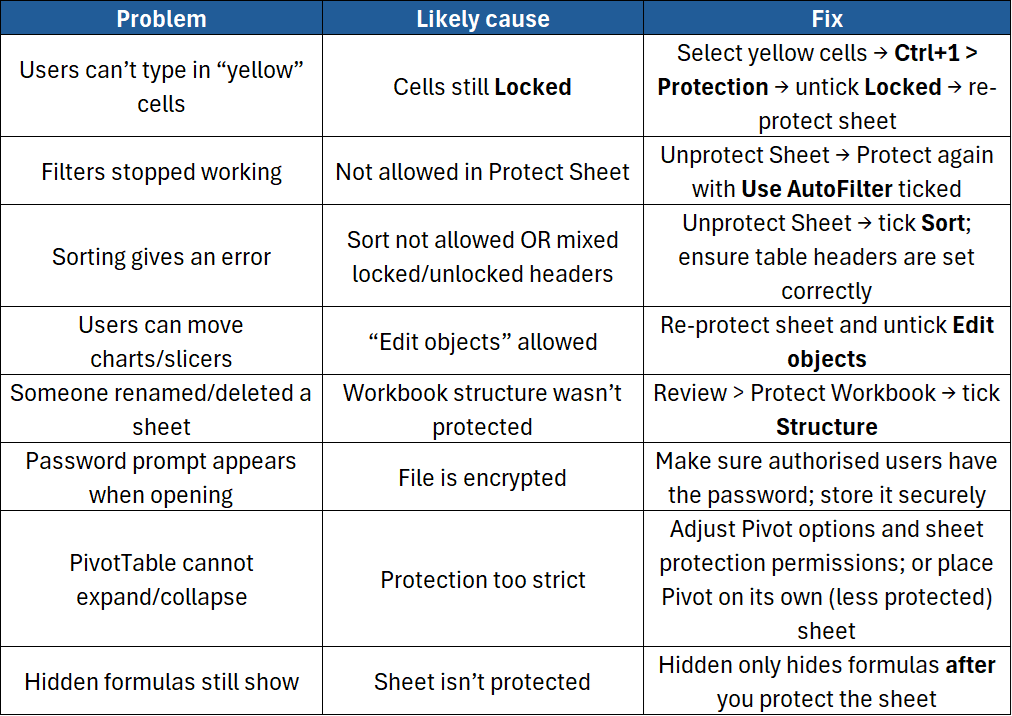
Step 14 — Troubleshooting guide
Step 15 — Best-practice checklist (copy/paste)
- ✅ Encrypt files that are confidential (File > Info > Protect > Encrypt with Password).
- ✅ Protect workbook structure to stop sheet renaming/deleting.
- ✅ Unlock input cells first, then Protect Sheet with the right options.
- ✅ Use Allow Users to Edit Ranges for shared input zones.
- ✅ Hide + Lock formula cells you don’t want exposed.
- ✅ Keep inputs, calcs, and reports on separate sheets.
- ✅ Enable only the actions users need (Sort, AutoFilter, Pivot).
- ✅ Use consistent colour cues for input cells (e.g., light yellow).
- ✅ Maintain a version log and keep a protected read-only copy for distribution.
- ✅ Remember: protection prevents accidents; encryption protects confidentiality.
Conclusion
Excel gives you several tools to protect your work: Protect Sheet to control actions on a worksheet, Protect Workbook to lock the sheet structure, and Encrypt with Password to stop unauthorised access to the file. Use them together. Unlock only the cells people should edit, hide formulas when needed, and allow sorting or filtering if your model requires it. With a simple plan and the right settings, you’ll keep your spreadsheets safe and easy to use.
If you’d like hands-on practice and expert patterns, join the relevant courses:
- Excel Introduction – Clean layouts, input vs calculation areas, and basic protection.
- Excel Intermediate – Structured models, tables, protection options, and data validation.
- Excel Advanced – Protecting dashboards, PivotTables on protected sheets, and workbook structure.
- Excel Power User: Mastering Complex Functions and Data Models – Robust modelling, audit trails, and secure distribution workflows.

