


How to Connect Power Apps to SharePoint Lists

Introduction
SharePoint lists are a great way to store business information. You can track requests, log issues, manage equipment, store contacts, and more. But the default SharePoint list form can feel basic, especially on mobile.
That’s where Power Apps helps. Power Apps lets you build friendly apps that connect to SharePoint lists. You can create a simple form for adding and editing items, add search and filters, show related data, and guide users with better screens and buttons.
In this guide you will learn how to:
- Create or prepare a SharePoint list for Power Apps
- Build a Canvas app connected to a list
- Add a SharePoint list as a data source (connector)
- View, add, edit, and delete list items from Power Apps
- Use forms (EditForm) and galleries (lists of items)
- Use
Patch()for more control - Handle common SharePoint columns (Choice, Person, Lookup, Attachments)
- Deal with delegation limits (so your search works on big lists)
- Use permissions and good practices so the app is safe and reliable
No coding background is needed. We’ll use plain language and simple examples.
What you need before you start
- A Microsoft 365 account with access to Power Apps and SharePoint
- Permission to view and edit the SharePoint list you want to use
- A SharePoint list that stores the data
You can start with a new list or an existing one.
Step 1: Create a SharePoint list that works well with Power Apps
Power Apps can connect to almost any SharePoint list, but your app is easier to build if the list is well designed.
Good column choices for apps
- Title (default) – rename it to something meaningful, like “Request Title”
- Single line of text – for names, codes, short notes
- Multiple lines of text – for descriptions (consider plain text)
- Choice – for status, category, priority
- Date and Time – for due dates, request dates
- Number / Currency – for amounts
- Yes/No – for flags like “Urgent”
- Person or Group – for owner or approver
- Attachments – useful for screenshots or supporting files
Columns to be careful with
- Lookup columns: they work, but can add complexity and delegation issues
- Managed Metadata: possible, but more advanced
- Complex calculated columns: sometimes better handled in the app
Set up sensible choices
Example: “Status” choice column:
- New
- In Progress
- Waiting
- Completed
Simple choices make apps smoother.
Step 2: Decide what type of Power App you are building
For SharePoint lists, most people start with a Canvas app because it is flexible and easy to understand.
Common app layouts:
- Phone layout (best for mobile)
- Tablet layout (best for desktop and wide screens)
Power Apps also has “custom forms” for SharePoint, but Canvas apps give you more control.
Step 3: Create a Canvas app from SharePoint (fastest option)
This is the quickest way to get a working app.
- Open your SharePoint list in SharePoint.
- Select Integrate > Power Apps > Create an app.
- Name the app (example: “RequestsApp”).
- Click Create.
Power Apps builds a basic 3-screen app:
- Browse screen (list of items)
- Detail screen (view an item)
- Edit screen (create or edit an item)
This is a great starting point.
Step 4: Add a SharePoint list as a data source (manual method)
If you already have an app and want to connect a list:
- In Power Apps Studio, click Data (left side).
- Click Add data.
- Choose SharePoint connector.
- Select the SharePoint site.
- Choose your list and click Connect.
Now the list is a data source in your app.
Step 5: Understand the key parts of the app (Galleries and Forms)
Power Apps apps usually use two main control types:
Gallery (for showing a list of items)
A gallery displays rows from a data source.
Example: a list of requests.
Useful gallery properties:
- Items: what the gallery shows
- OnSelect: what happens when you click a row
Typical Items formula:
Requests
Or filtered:
Filter(Requests, Status.Value = "In Progress")
Form (for viewing and editing)
Forms are the easiest way to edit SharePoint list items.
You will commonly use:
- DisplayForm (read-only)
- EditForm (edit or new item)
Important form properties:
- DataSource: your SharePoint list
- Item: which record you are showing
- DefaultMode: Edit, View, or New
Step 6: Make the Browse screen easier to use (search and filter)
Most apps need search.
Basic search example:
Search(Requests, txtSearch.Text, "Title")
Search multiple columns:
Search(Requests, txtSearch.Text, "Title", "CustomerName")
Add a filter dropdown for status:
Filter(
    Requests,
    IsBlank(ddStatus.Selected.Value) || Status.Value = ddStatus.Selected.Value
)
Then apply search on top (simple version):
Search(
    Filter(
        Requests,
        IsBlank(ddStatus.Selected.Value) || Status.Value = ddStatus.Selected.Value
    ),
    txtSearch.Text,
    "Title",
    "CustomerName"
)
Tip: For large lists, search and filter can run into delegation limits. We cover this later.
Step 7: Add a “New item” button
On the browse screen, add a button:
OnSelect:
NewForm(EditForm1);
Navigate(EditScreen1, ScreenTransition.None)
This puts the form into “new record” mode and takes the user to the edit screen.
Step 8: Save and cancel buttons (SubmitForm)
If you use an EditForm, saving is simple.
Save button OnSelect:
SubmitForm(EditForm1)
Cancel button OnSelect:
ResetForm(EditForm1);
Back()
To show a success message, use the form’s OnSuccess property:
Notify("Saved successfully.", NotificationType.Success);
Back()
If saving fails, use OnFailure:
Notify("Save failed. Please try again.", NotificationType.Error)
Step 9: Edit an existing item
When a user selects a row in a gallery, you typically navigate to the detail screen with that record.
Gallery OnSelect:
Navigate(DetailScreen1, ScreenTransition.None)
Detail form Item property:
Gallery1.Selected
To edit from the detail screen:
Edit button OnSelect:
EditForm(EditForm1);
Navigate(EditScreen1, ScreenTransition.None)
Step 10: Use Patch() for more control (optional, but powerful)
Forms are easiest. But sometimes you want full control and fewer “heavy” controls. Patch() lets you create or update an item directly.
Create a new item
Patch(
    Requests,
    Defaults(Requests),
    {
        Title: txtTitle.Text,
        Status: {Value: ddStatus.Selected.Value},
        DueDate: dtDue.SelectedDate
    }
)
Update an existing item
Patch(
    Requests,
    Gallery1.Selected,
    {
        Status: {Value: "Completed"},
        CompletedDate: Today()
    }
)
Use Patch when:
- you have a custom layout without a form
- you want to update only a few fields
- you want to save multiple records in a loop (advanced)
Step 11: Handle common SharePoint column types
Choice column
Choice values usually appear as .Value:
- Display:
ThisItem.Status.Value - Save using Patch:
Status: {Value: ddStatus.Selected.Value}
Person column
Person fields are records. If you use a combo box connected to Office 365 Users, you may patch the person record.
Common approach:
- Use a People picker control (Combo box)
- Store the selected user record
This can get advanced fast. For a basic app, keep Person fields to one or two and use the standard form control where possible.
Lookup column
Lookup values also behave like records:
ThisItem.Project.Value
Lookups can cause delegation issues on large lists. If performance matters, consider storing a key value (like ProjectID) instead of a lookup.
Attachments
Attachments are easy with forms:
- Add the Attachments data card
Users can upload files from within the app.
Date fields
Use a DatePicker:
dtDue.SelectedDate
Step 12: Permissions and security (important)
Power Apps respects SharePoint permissions. That means:
- If users can’t edit the list, they can’t edit through the app
- If users can’t see items (because of permissions), they won’t see them in the app
Common options:
- Use SharePoint list permissions (simple)
- Use item-level permissions (more complex)
- Use a separate list for confidential items
Best practice:
- Don’t try to hide sensitive data only with app logic. Always use SharePoint permissions.
Step 13: Delegation limits (so your app works on big lists)
Power Apps can’t always bring back every record when you use certain functions. This is called delegation.
Simple explanation
- Delegable = SharePoint does the work on the server (good for large lists)
- Not delegable = Power Apps tries to do the work locally (limited)
Search is often not fully delegable for SharePoint lists.
How to design around delegation
- Use Filter with simple conditions (often delegable)
- Use indexed SharePoint columns (like Status, Created, Owner)
- Avoid complex “contains” searches across multiple text columns on large lists
- Use a “starts with” approach when possible
- Consider building a separate search column in SharePoint (e.g., a combined searchable string)
- If the list is truly big, consider Dataverse (more advanced)
A practical tip: if your list is under a few thousand items, careful design is often enough.
Step 14: Improve usability (small changes that matter)
- Show only key fields on the browse screen (title + status + due date)
- Use colour or icons for status and priority
- Add a confirmation dialog before delete
- Keep labels short and consistent
- Use a clear “Home” button and predictable navigation
- Use
Notify()messages for saves and errors
Step 15: Testing, publishing, and sharing
- Click App Checker to find issues.
- Save the app.
- Publish the app.
- Share it with users:
- Assign users or groups
- Make sure they also have SharePoint list permissions
If users report they can open the app but see no data, it’s usually a SharePoint permission issue.
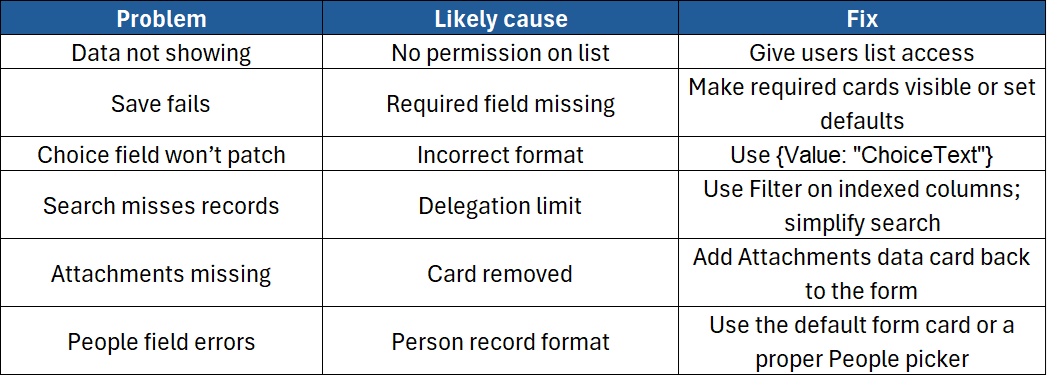
Common problems and quick fixes
Conclusion
Connecting Power Apps to SharePoint lists is one of the most practical ways to build business apps quickly. With a SharePoint list as your data source, you can create easy forms, searchable lists, and simple workflows that work well on desktop and mobile. Start with the auto-generated app, then improve it step by step with filters, better layouts, and clean save logic.
If you’d like hands-on guidance building Canvas apps with SharePoint lists (forms, Patch, permissions, delegation, and real examples), take a look at our course:

